# Users
TIP
For system users (in XOA), please refer to XOA section. Here, we are only talking about users in Xen Orchestra application
There are 2 types of XO users:
- admins, with all rights on all connected resources
- users, with no rights by default
# Authentication
Xen Orchestra supports various types of user authentication, internal or even external thanks to the usage of the Passport library (opens new window).
TIP
Any account created by an external authentication process (LDAP, SSO...) will be a user without any permission. Also, you don't have to create an external user by yourself: it will be created automatically in Xen Orchestra after its first connection.
# Built-in
This is the default method. Creating a user is very simple:
- Go into the Settings view, select "Users"
- You can create a user or an admin, with their password (or generate one)
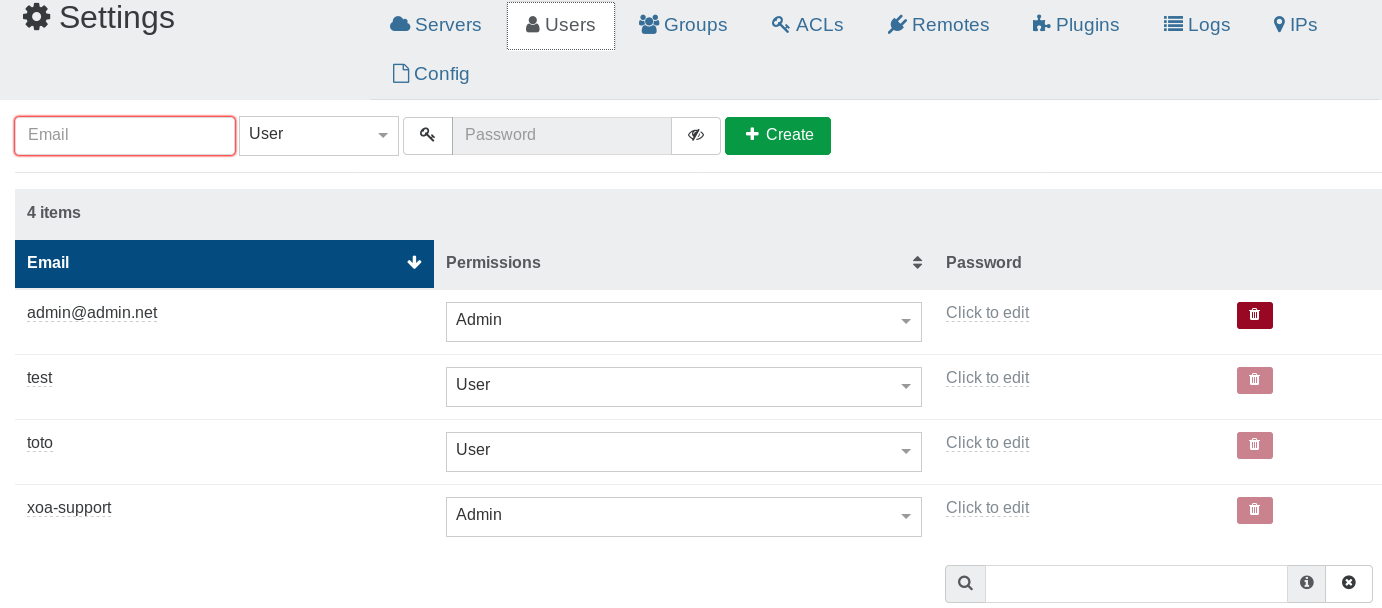
By default, a user won't have any permissions. At the opposite, an admin will have all rights.
# LDAP
XO currently supports connections to LDAP directories, like Open LDAP or Active Directory.
To configure your LDAP, you need to go into the Plugins section in the "Settings" view. Then configure it:
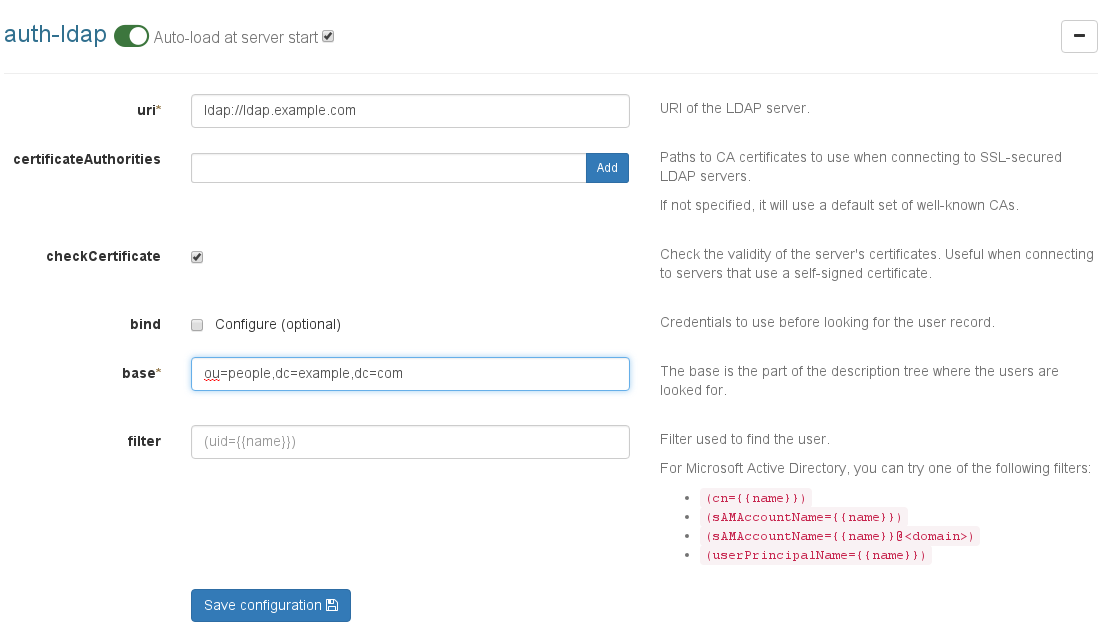
Don't forget to save the configuration, and also check if the plugin is activated (green button on top).
# Filters
LDAP Filters allow you to properly match your user. It's not an easy task to always find the right filter, and it entirely depends on your LDAP configuration. Still, here is a list of common filters:
'(uid=)'is usually the default filter for Open LDAP'(cn=)','(sAMAccountName=)','(sAMAccountName=@<domain>)'or even'(userPrincipalName=)'are widely used for Active Directory. Please check with your AD Admin to find the right one.
After finishing the configuration, you can try to log in with your LDAP username and password. Finally, right after your initial successful log in, your account will be visible in the user list of Xen Orchestra.
# Groups
The LDAP plugin allows you to synchronize user groups. To configure the synchronization, check the checkbox next to Synchronize groups and fill out the configuration:
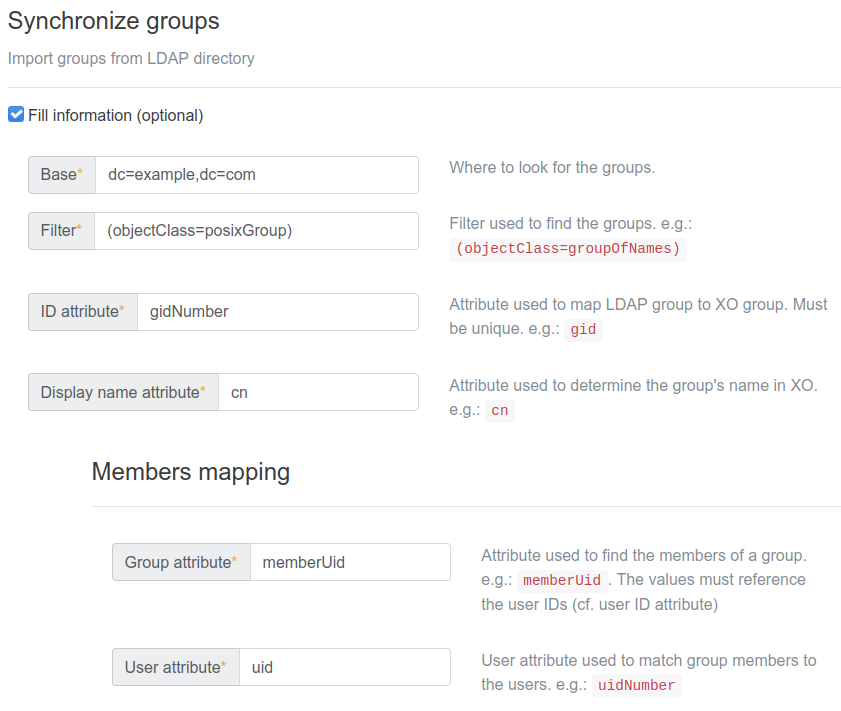
- Base and filter: similar to the user configuration. The plugin needs an entry point in the directory and a filter to find the groups.
- ID attribute: the attribute that the plugin will use to uniquely identify each group. It must be unique across groups and must not change over time. On each synchronization, the plugin will compare LDAP groups with XO groups, then try to match them based on this attribute and create/update XO groups if necessary.
- Display name attribute: the attribute that will be used as the group's name in XO.
- Members mapping: this part of the configuration is used to determine which LDAP users belong to which LDAP groups. Given an LDAP directory that looks like this:
User:
objectClass: Person
cn: Bruce Wayne
uid: 347
...
Group:
objectClass: Group
cn: heroes
displayName: Heroes
gid: 456
member: 347
member: 348
...
The plugin needs to know that Bruce Wayne belongs to the heroes group. To do so, you need to set 2 entries in the configuration:
- Group attribute, which is the name of the group attribute that is used to list users within a group. In this example, it would be
member. - User attribute, which is the name of the user attribute that is used to reference users in groups. In this example, it would be
uidsince347,348, etc. are useruids.
Save the configuration and you're good to go. From now on, every time an LDAP user logs into XO, the plugin will automatically create or update that user's groups and add them to those groups. If you need to import all the groups at once, you can do so from Settings > Groups > Synchronize LDAP Groups. This can be useful if you want to assign ACLs on groups without having to wait for a member of the group to log in.
TIP
Importing the groups doesn't import their members. The users will still be imported one by one when they log in for the first time.
TIP
You can find the LDAP users by entering this filter in the users table: authProviders:ldap?.
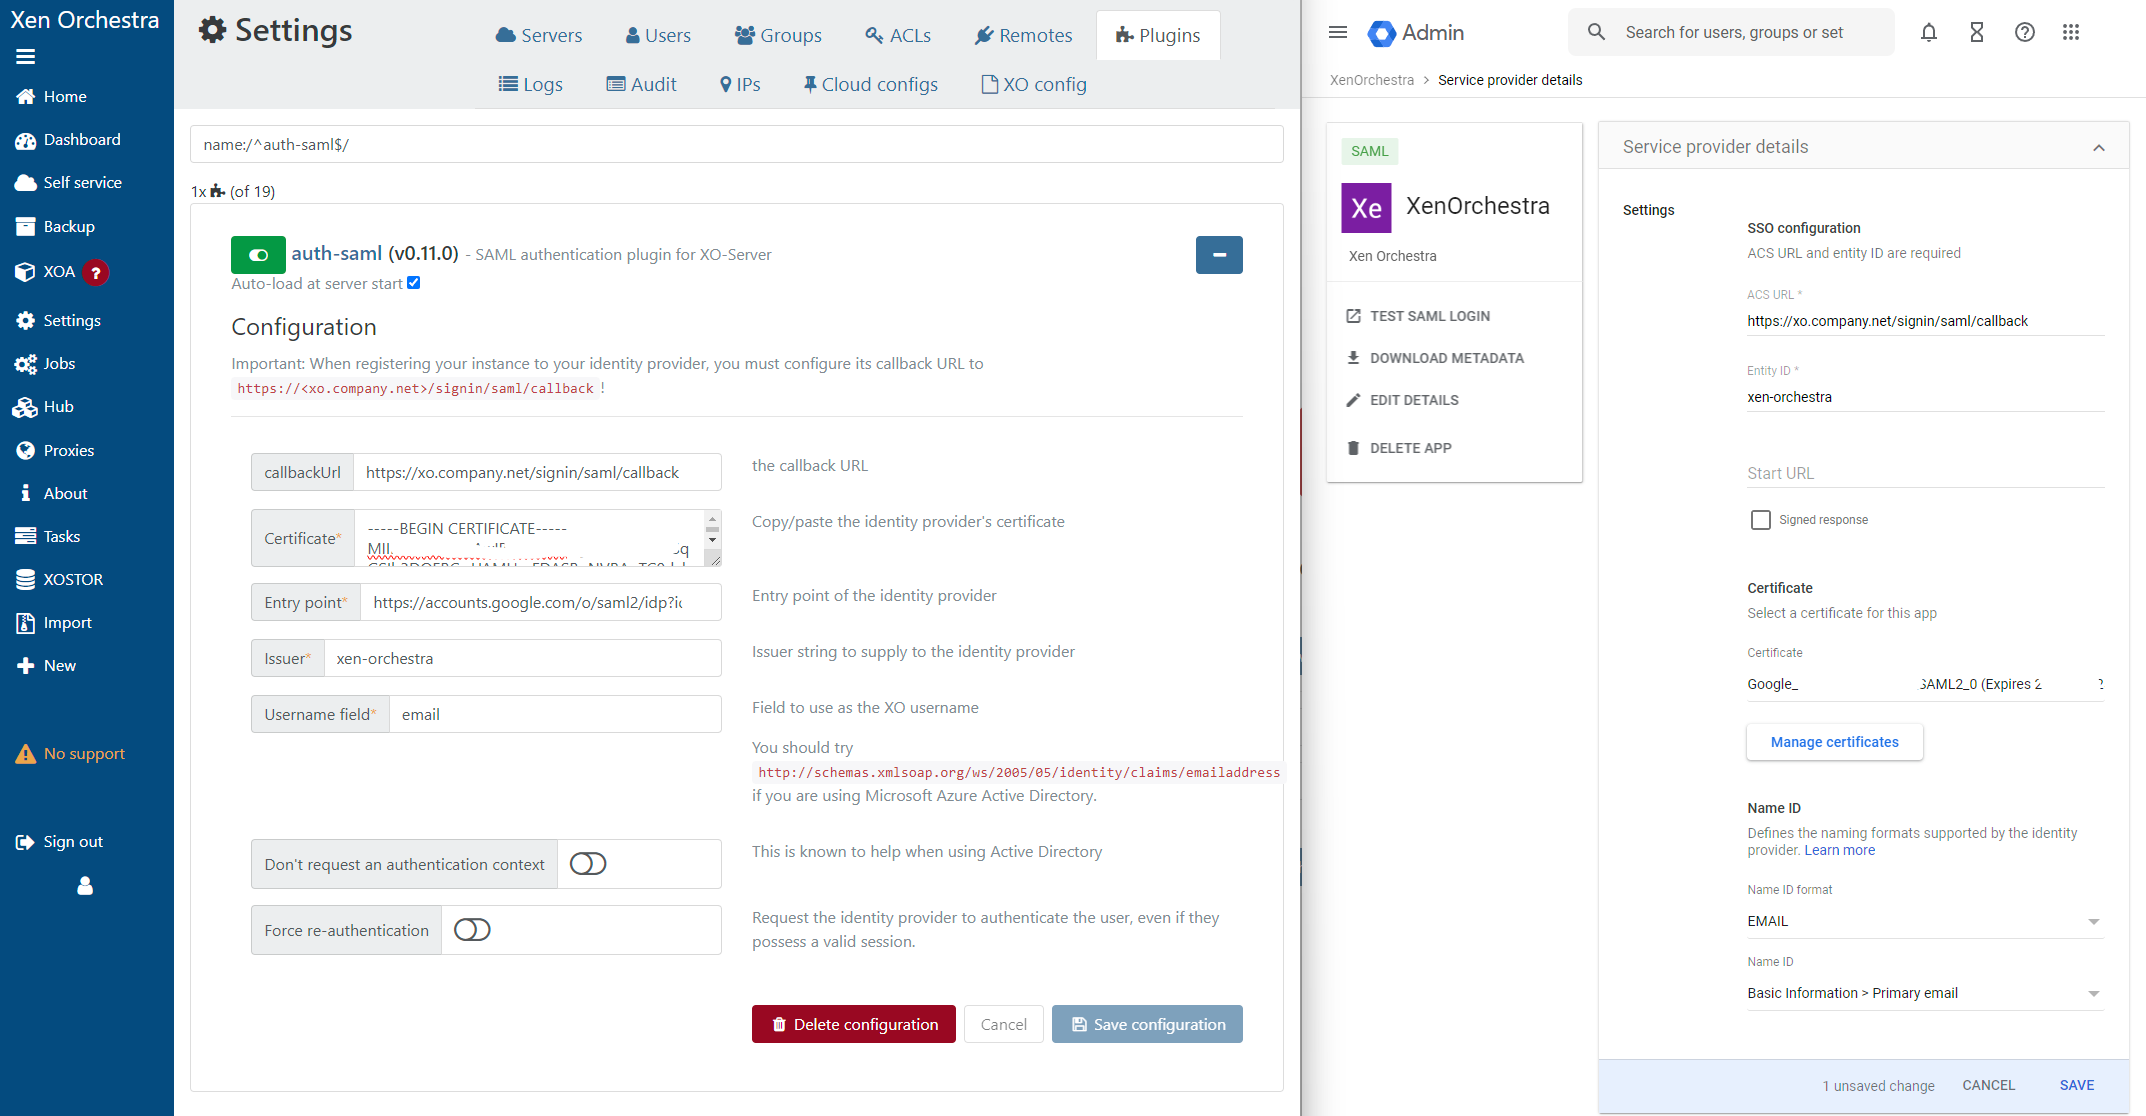
# SAML
This plugin allows SAML users to authenticate to Xen-Orchestra.
The first time a user signs in, XO will create a new XO user with the same identifier.
# Configuration
In the "Settings" then "Plugins" view, expand the SAML plugin configuration. Then provide the needed fields:
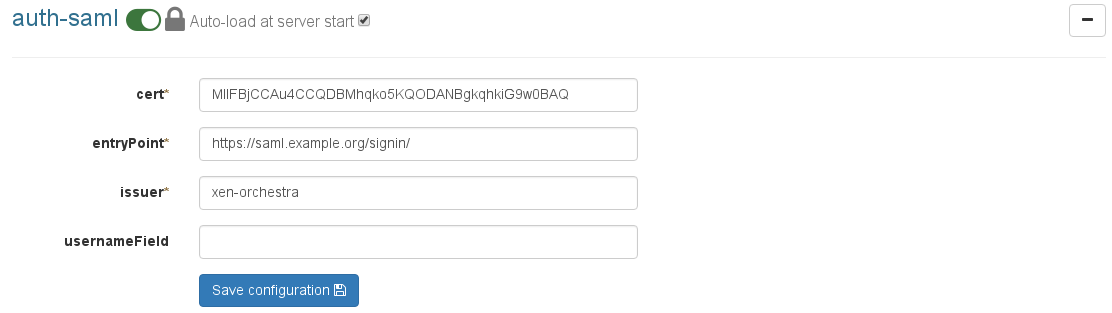
Save the configuration and then activate the plugin (button on top).
# Vendor specific
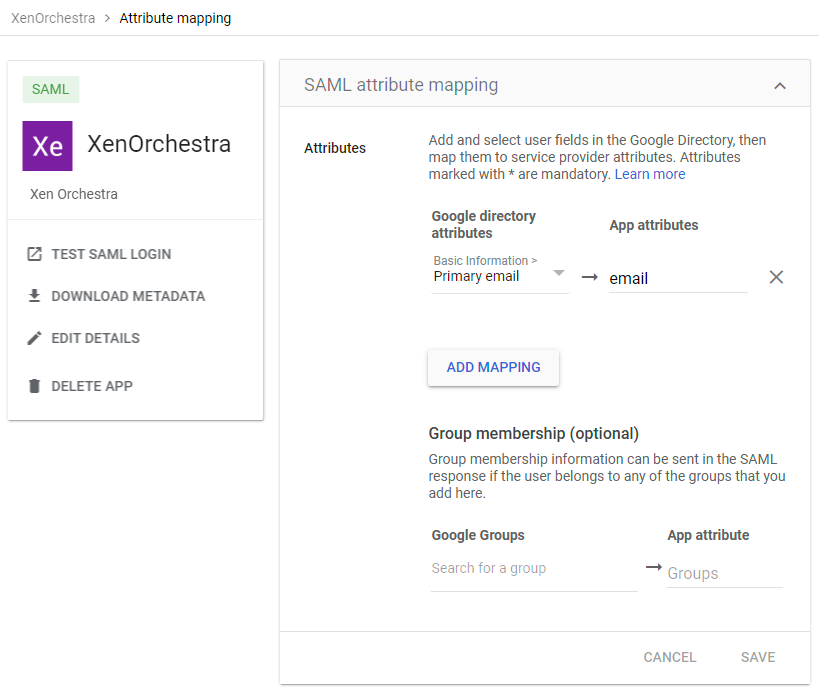
# Google Workspace - SAML support.google.com (opens new window)
Use the screenshots below as a reference as how to setup SAML with Google Workspace.
Note: Right now even when the authorization is successfull, you will be redirected to the
https://xo.company.net/signinpage. However, just browse directly into the bare URLhttps://xo.company.net, and you'll now be logged in and can use the XO-dashboard.
The first login will create the user inside XO, as a non-privileged user. An administrator then has to promote the user to the apropriate group. (XO: Settings/Users).
Also make sure to adjust the SAML attribute mapping in the Google Workspace configuration. (Primary email -> email)
# GitHub
This plugin allows any GitHub user to authenticate to Xen Orchestra.
The first time a user signs in, XO will create a new XO user with the same identifier (i.e. GitHub name), with user permissions. An existing admin will need to apply the appropriate permissions for your environment.
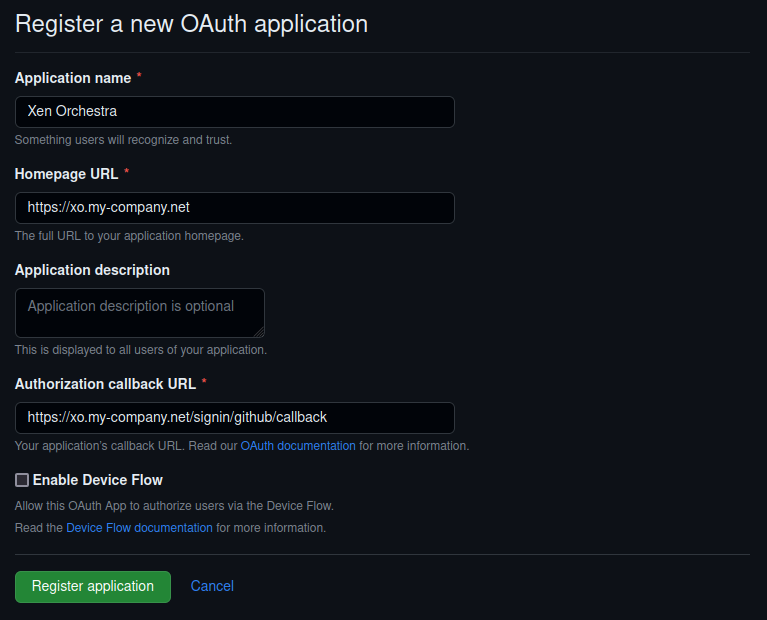
First you need to configure a new app in your GitHub account. Go to your Github settings > "Developer Settings" > "OAuth Apps" > "New OAuth App".
- Name your GitHub application under "Application Name".
- Enter your Xen Orchestra URL (or IP) under "Homepage URL"
- Add your "Authorization callback URL" (for example, https://homepageUrl/signin/github/callback)
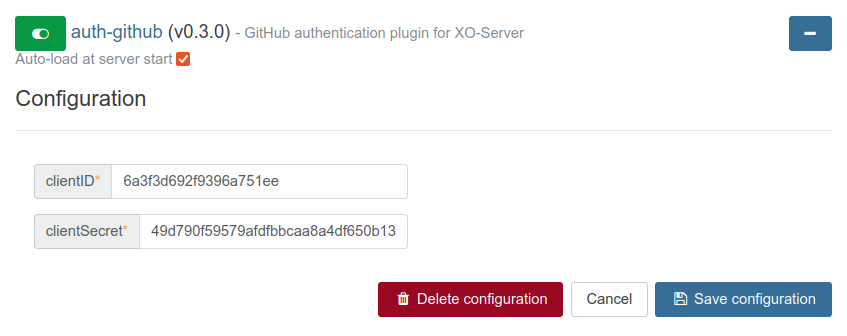
When you get your Client ID and your Client secret, you can configure them in the GitHub Plugin inside the "Settings/Plugins" view of Xen Orchestra.

Be sure to activate the plugin after you save the configuration (button on top). When it's done, you'll see a link in the login view, this is where you'll go to authenticate:
This plugin allows Google users to authenticate to Xen-Orchestra.
The first time a user signs in, XO will create a new XO user with the same identifier, without any permissions.
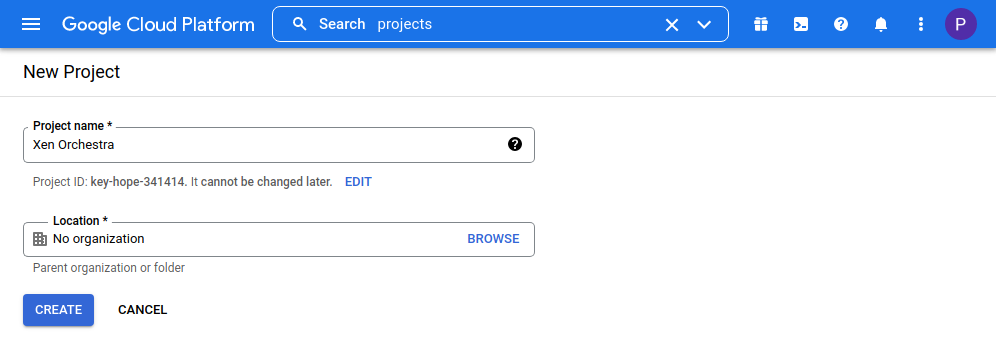
# Creating the Google project
Go to Google's Credentials page (opens new window) and create a new project:
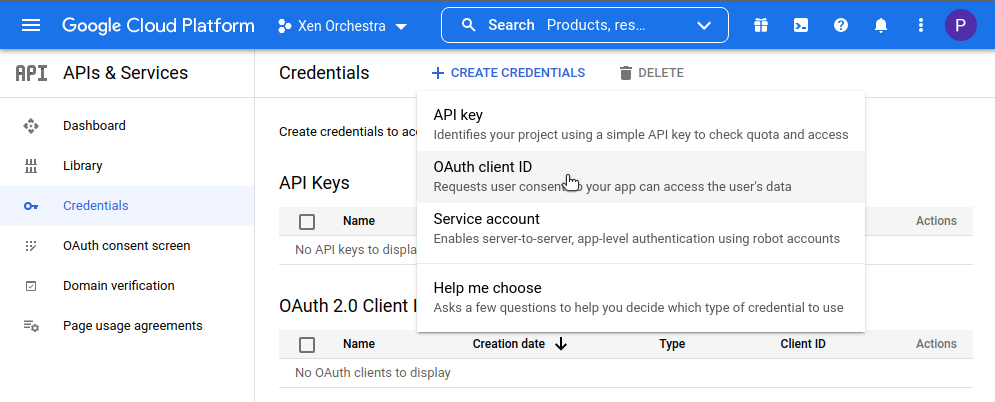
Configure an OAuth consent screen if requested then create OAuth 2.0 credentials:

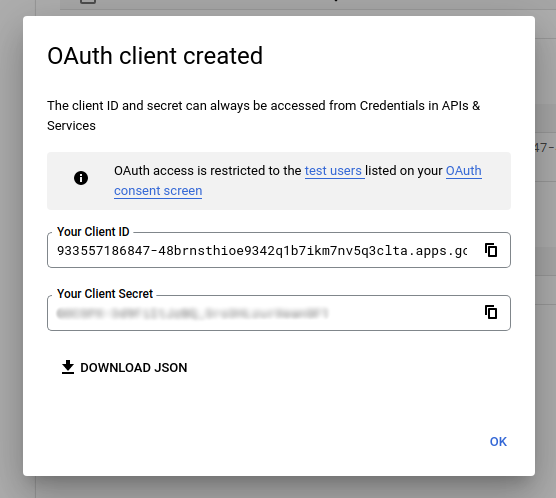
Get your client ID and client secret:
# Configure the XO plugin
In Settings, then Plugins, expand the Google plugin details and configure it with the information from the Google Console:
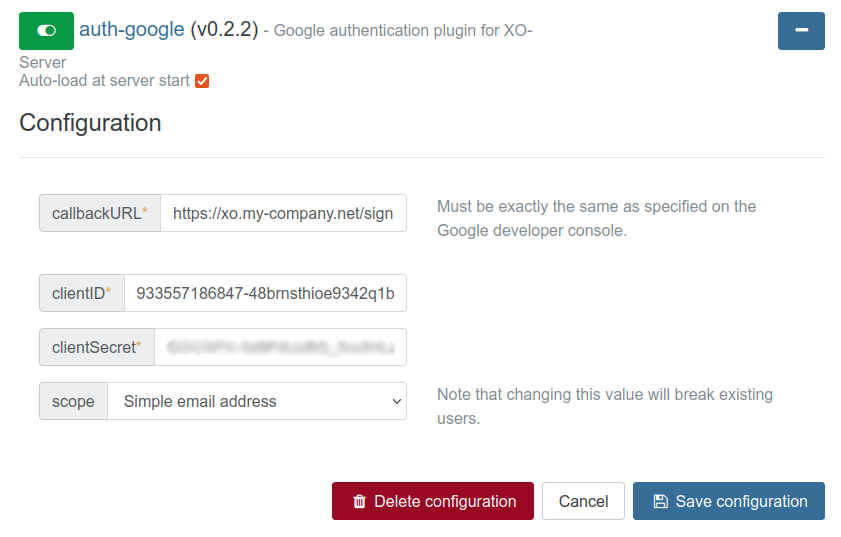
Be sure to activate the plugin after you save the configuration (button on top).
You can now connect with your Google account in the login page.
# ACLs
TIP
ACLs are permissions that apply to pre-existing objects. Only a super admin (XO administrator) can create objects.
ACLs are the permissions for your users or groups. The ACLs view can be accessed in the "Settings" panel.
- Select the user or group you want to apply permissions on
- Select the object on which the permission will apply
- Choose the role for this ACL
- Click on "Create"
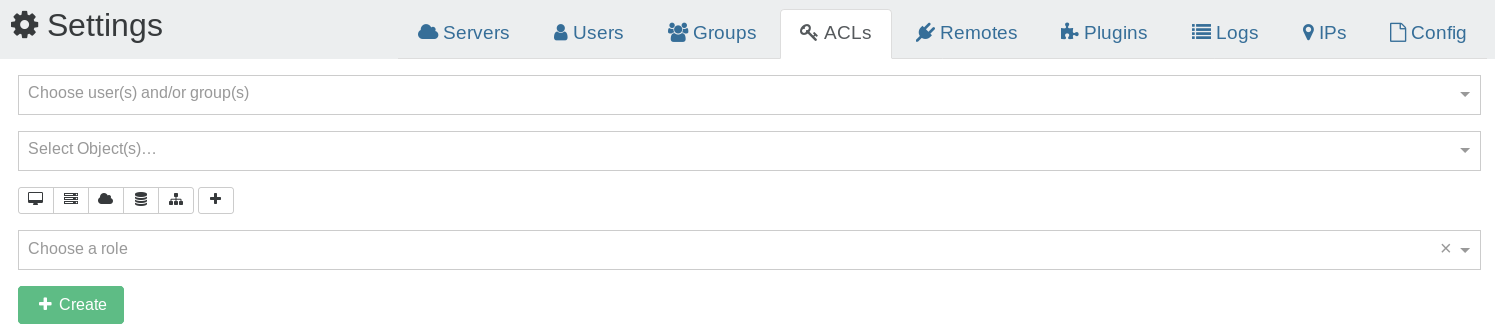
TIP
You can click to add multiple objects at the same time!
Your ACL is now available in the right list:
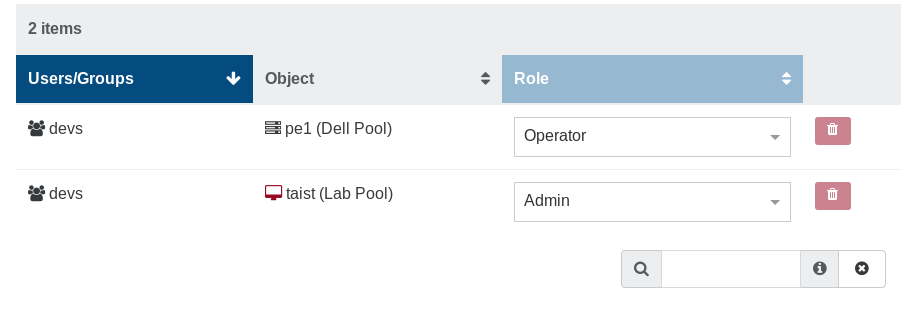
You can edit/remove existing ACLs here.
# Roles
There are 3 different roles for your users:
- Admin
- Operator
- Viewer
# Admin
An object admin can do everything on it, even destroy it. E.g with its admin VM:
- remove it
- migrate it (to a host with admin permission on it)
- modify the VM resources, name and description
- clone it
- copy it
- convert it into a template
- snapshot it (even revert from a snapshot)
- export it
- attach/add visible disks
- same for network cards
# Operator
An operator can make everyday operations on assigned objects. E.g on a VM:
- eject a CD
- insert a CD (if he can view the ISO storage repository)
- start, restart, shutdown, suspend/resume it
All other operations are forbidden.
# Viewer
A viewer can only see the VM state and its metrics. That's all!
# Inheritance
Objects have a hierarchy: a Pool contains all its hosts, containing itself all its VMs.
If you give a view permission to a user (or a group) on a pool, he will automatically see all the objects inside this pool (SRs, hosts, VMs).
# Examples
# Allow a user to install an OS
If the OS install needs an ISO, you need to give this user 2 permissions:
- Operate on the VM (e.g to start it)
- View on the ISO Storage containing the needed ISO.
# Self-service portal
The self-service feature allows users to create new VMs. This is different from delegating existing resources (VM's) to them, and it leads to a lot of possibilities.
# Set of resources
To create a new set of resources to delegate, go to the "Self Service" section in the main menu:
# Create a set
TIP
Only an admin can create a set of resources
To allow people to create VMs as they want, we need to give them a part of your XCP-ng/XenServer resources (disk space, CPUs, RAM). You can call this "general quotas" if you like. But you first need to decide which resources will be used.
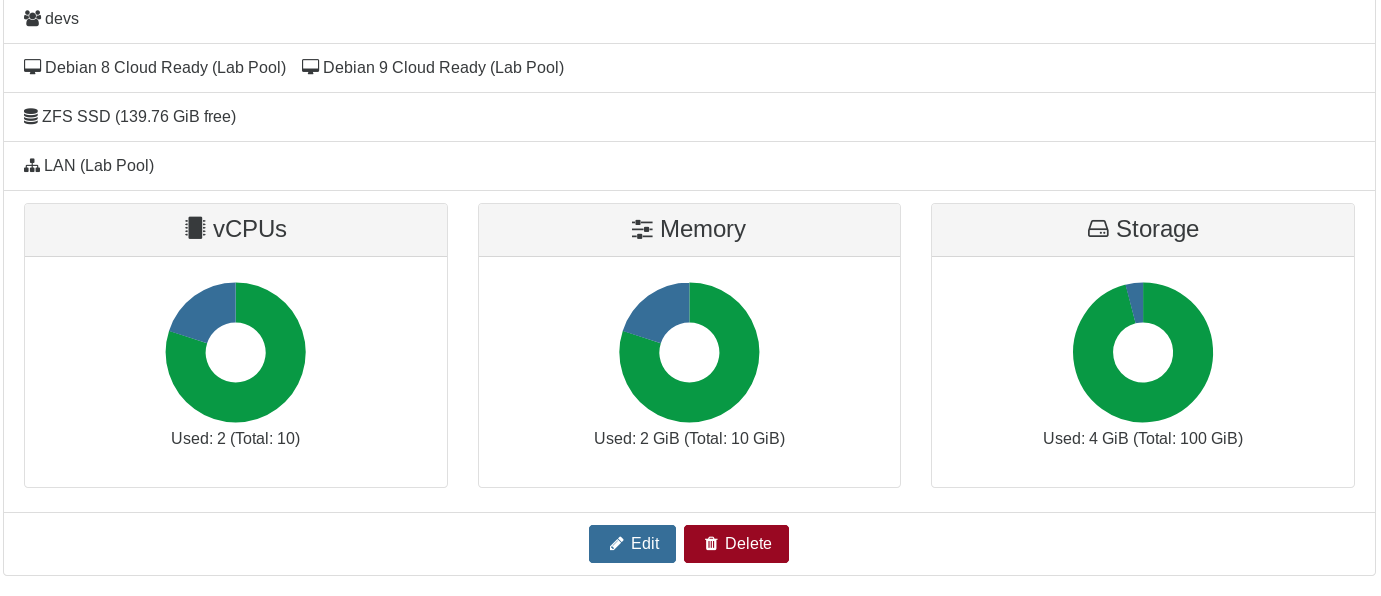
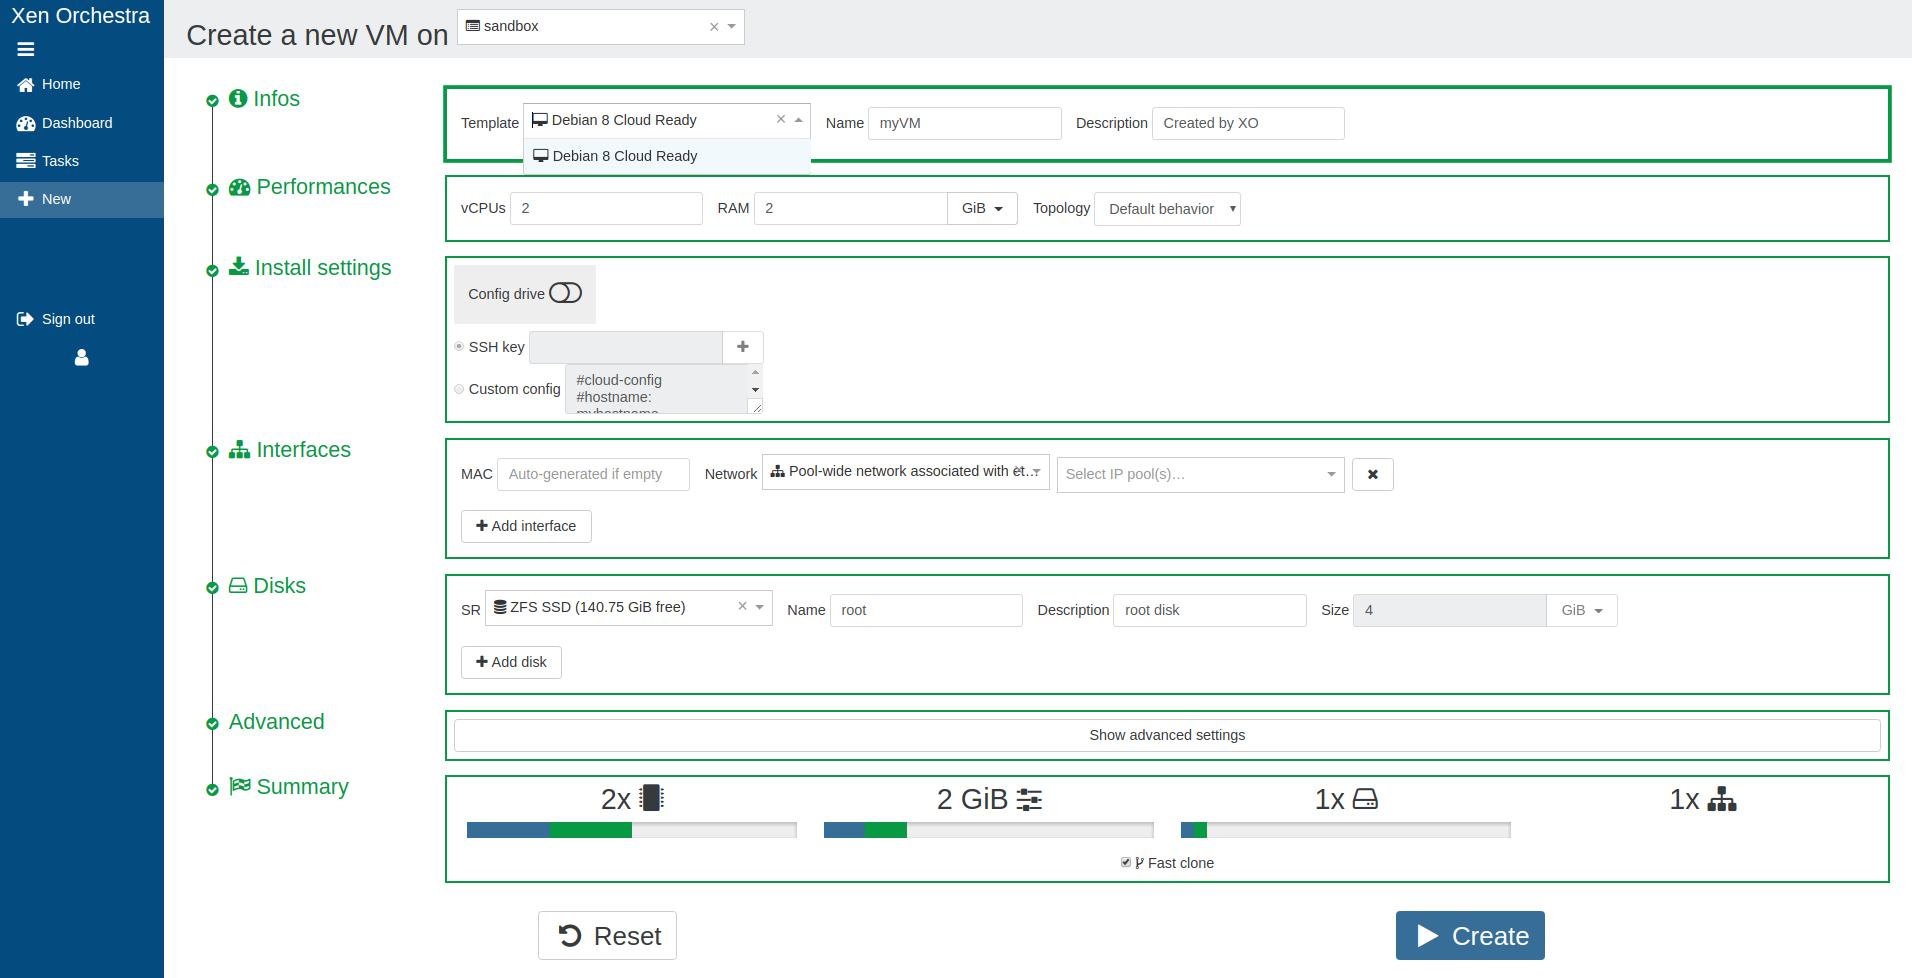
In this example below, we'll create a set called "sandbox" with:
- "devs" is the group that can use this set (all users in the group)
- "Lab Pool" is the pool where they can play
- "Debian 8 Cloud Ready" is the only template they can use
- "SSD NFS" is the only SR where they can create VMs
- "Pool-wide network with eth0" is the only available network for them

As you can see, only compatible hosts are shown and can be used for this resource set (hosts in another pool aren't shown). This way, you can be sure to have resources free for tasks other than self-service.
TIP
Don't forget to add an ISO SR to allow your users to install VMs with CD if necessary
# Quotas
Then, you can define quotas on this set:
- max vCPUs
- max RAM
- max disk usage
TIP
Replicated VMs and snapshots created by a backup job don't use quotas.
TIP
A snapshot of a Self Service VM will use as much resources as a VM would. You can disable this by setting ignoreVmSnapshotResources to true in the selfService section of xo-server's config.
When you click on create, you can see the resource set and remove or edit it:
# Usage (user side)
As soon as a user is granted a resource set, it displays a new button in their main view: "new".

Now, the user can create a VM with only the resources granted in the set:
And the recap before creation:

If the "Create" button is disabled, it means the user requested more resources than available.
Finally, if a user has been granted access to multiple resource sets, they can be switched in the top right of the screen.
# Toward the Cloud
Self-service is a major step in the Cloud. Combine it with our Cloudinit compatible VM creation for a full experience:
- create a Cloud ready template
- create a set and put Cloud templates inside
- delegate this set to a group of users
Now, your authorized users can create VMs with their SSH keys, grow template disks if needed, etc. Everything is inside a "sandbox" (the resource set) you defined earlier!
# Audit log
XO Audit Log is a plugin that records all important actions performed by users and provides the administrators an overview of each action. This gives them an idea of the users behavior regarding their infrastructure in order to track suspicious activities.
# How does it work?
XO Audit Log listens to important actions performed by users and stores them in the XOA database using the hash chain structure (opens new window).
# Trustability of the records
Stored records are secured by:
structure: records are chained using the hash chain structure which means that each record is linked to its parent in a cryptographically secure way. This structure prevents the alteration of old records.
hash upload: the hash chain structure has limits, it does not protect from the rewrite of recent/all records. To reduce this risk, the Audit log plugin regularly uploads the last record hash to our database after checking the integrity of the whole record chain. This functionality keeps the records safe by notifying users in case of alteration of the records.
# Configuration
The recording of the users' actions is disabled by default. To enable it:
- go into
settings/plugins - expand the
auditconfiguration - toggle active and save the configuration
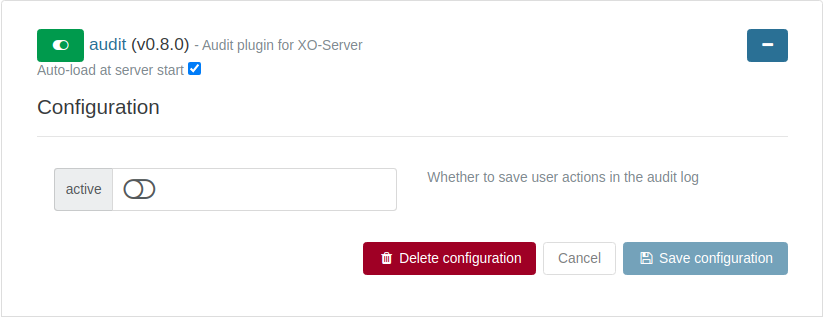
Now, the audit plugin will record users' actions and upload the last record in the chain every day at 06:00 AM (UTC).
# Debugging
If you can't log in, please check the logs of xo-server (opens new window).