
Xen Orchestra 5.79
This is the first release of 2023. And it's a flying start: with so many improvements, it's one of our busiest releases of all time!


Let's take a deeper dive into what's inside this 5.79 version. A large part is dedicated to the VMware migration tool, but there's also many other new things and improvements, even in our current web UI version.
TL;DR: we are sorry for your mouse wheel, there's a lot to talk about!
🐦 VMware migration tool
It's our first official release for our VMware migration tool, logically called V2V (Virtual to Virtual, or VMware to Vates)!
No agent to install, and no need to export a VM anywhere (e.g in OVA) to finally re-import it in XCP-ng, it's entirely done in streaming "on the fly". We also now support official warm migration with it (see below).
Warm migration from VMware to XCP-ng
We are really proud to introduce warm migration available from ESXi 6.3 or older. You can do it very easily, and we also added various parameters to tune the way it works for your own requirements.
The warm migration process works like this:
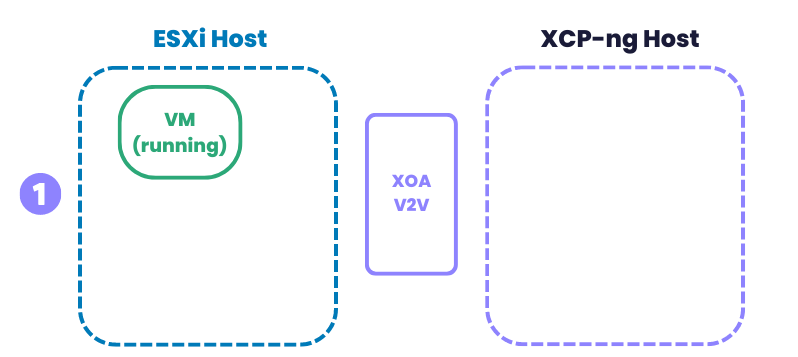
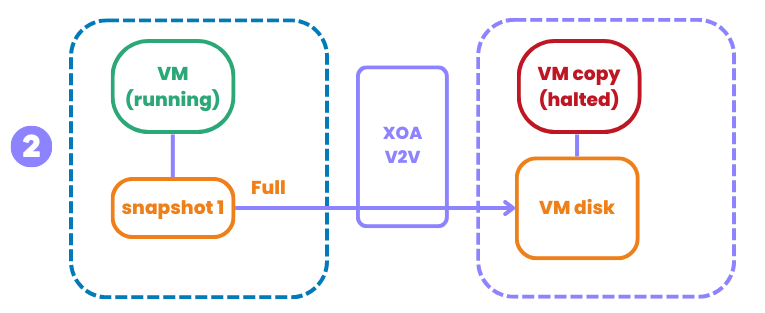
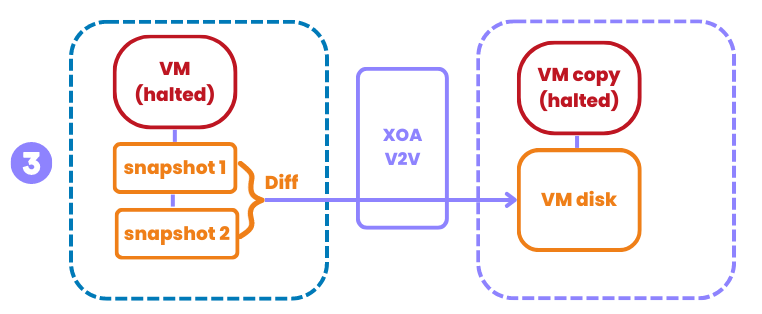
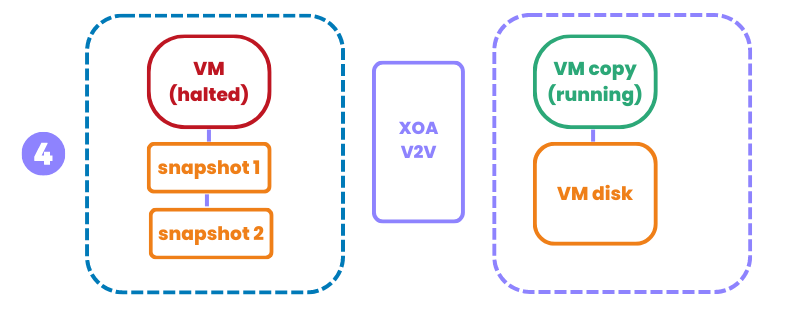
This process is fully automated, without any human intervention after it starts on step 1.
To start the warm migration, you can use xo-cli with the following arguments:
vm.importFromEsxi host=<ESXi_IP_address> user=<ESXi_user> password=<ESXi_password> sslVerify=false vm=<ESXi_VM_ID> network=<XCP_Network_UUID> sr=<XCP_SR_UUID> stopSource=true thin=trueThe extra args you might be wondering about:
stopSourceis used to shutdown the original VM (false by default, usetruefor a real warm migration).thinis transferring the content in thin mode on XCP-ng. We advise to always set it totrue, otherwise, you'll also transfer empty blocks. The only drawback is reading the content twice on the VMware side to get the structure of the disk, but in the end, your disks will be smaller on the XCP-ng side.
Cold migration
It's also possible to make a cold migration for any ESXi version. It's very simple, but this needs a longer VM downtime, since the VM will be halted during the full -and only- transfer. To do the cold migration, it's very simple: it's exactly the same process as with warm migration, but your VM should be halted first on your VMware host before starting the process. That's it! An example:
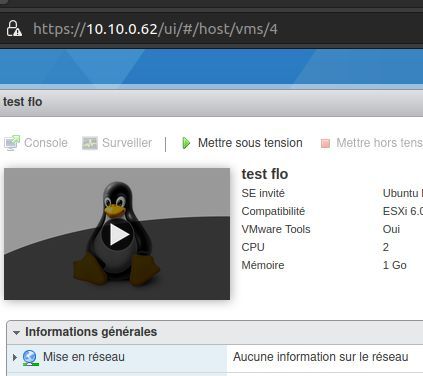
vm.importFromEsxi host=<ESXi_IP_address> user=<ESXi_user> password=<ESXi_password> sslVerify=false vm=<ESXi_VM_ID> network=<XCP_Network_UUID> sr=<XCP_SR_UUID> thin=trueHow to get your VM ID
When you use vCenter, navigate to your VM. In the URL field of your browser, you'll see the ID, here the number 4:
Feedback is always welcome, you can participate in this dedicated forum thread.
What's next
Our goal is to release warm migration for any ESXi version in our February release, and to continue to optimize it. And ideally, to even get rid of VM ID questions or finding the VM, instead directly using the tool to list everything in Xen Orchestra. Stay tuned!
📡 REST API
Our work continues on providing more content to our REST API, in parallel of our existing JSON-RPC over websocket API. As a quick reminder, this REST API is made to be simple to use and request from anywhere, even using a simple curl command in a command shell.
Resident VMs on a host
This feature was asked for by the community, and the use case is pretty simple but powerful: how to quickly list any host having no VMs running on it? Now, you can simply run this:
curl \
    -b authenticationToken=<token> \
http://xoa.example.com/rest/v0/hosts?filter=residentVms:length:0Exporting disks in raw format
It's very similar to our previous disk export capability, but this time, you can decide the export format, eg using raw if you want to export the content without any format. This can be useful in various scenarios:
curl \
  -b authenticationToken=<token> \
  'https://xoa.example.org/rest/v0/vdis/1a269782-ea93-4c4c-897a-475365f7b674.raw' \
  > myDisk.raw
Change name or description of any object
This is the first method that is now able to modify an object property. This is done via an HTTP PATCH request.
We decided to start with name_label and name_description, because it's pretty simple to implement:
curl \
  -X PATCH \
  -b authenticationToken=<token> \
  -H 'Content-Type: application/json' \
  -H 'Accept: application/json' \
  -d '{ "name_label": "The new name", "name_description": "The new description" }' \
  'https://xo.example.org/rest/v0/vms/770aa52a-fd42-8faf-f167-8c5c4a237cac'
Removing VMs and VM disks
This is also the first destructive method we've implemented! Using it with caution, the HTTP DELETE request is pretty explicit.
To remove a VM:
curl \
  -X DELETE \
  -b authenticationToken=<token> \
  'https://xo.example.org/rest/v0/vms/770aa52a-fd42-8faf-f167-8c5c4a237cac' \
  | cat
And to remove a disk:
curl \
  -X DELETE \
  -b authenticationToken=<token> \
  'https://xo.example.org/rest/v0/vdis/1a269782-ea93-4c4c-897a-475365f7b674' \
  | cat
☸️ Kubernetes recipe updated
Another minor -but useful- improvement for people who want to test our fully automated Kubernetes cluster deployment: you can now rely on specific static IP addresses for your deployed Nodes. It can be handy for a lab where you don't want to install a DHCP server. Obviously, it's mostly meant for Kubernetes testing purposes.
🔭 XO Lite
Another leap forward for XO Lite, the local web UI to manage your host (or one pool). We still spend a lot of time crafting all the new components, but this is also for a good reason: providing a very nice and coherent interface.
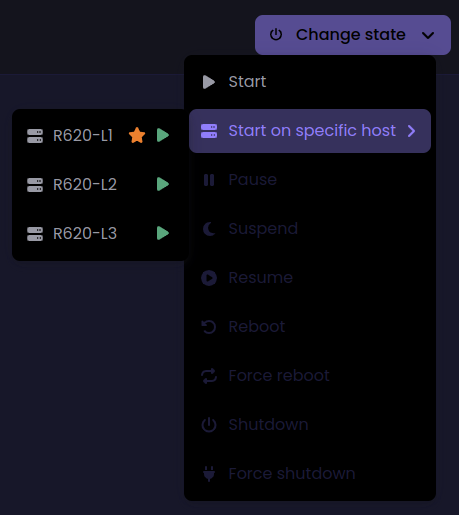
For this release, the whole XO Lite team is happy to present new features, allowing the tool to enter a new phase: it's now possible to perform actions on your VMs!

VM actions
We managed to add all the VM "power" actions in this XO Lite release: starting a VM (even on a specific host), pause, suspend, resume, reboot, force reboot, shutdown and force shutdown.
For people who previously could only rely on the xe CLI for simple operations like this, you have now a more graphical alternative without installing anything anywhere!
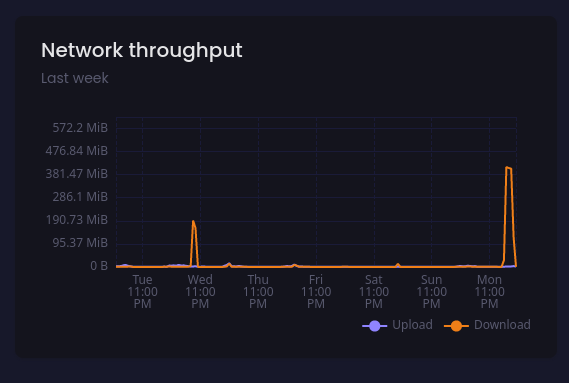
Improved responsive design and new graphs
The dashboard view is now optimized and correctly uses the space without generating extra horizontal scroll:
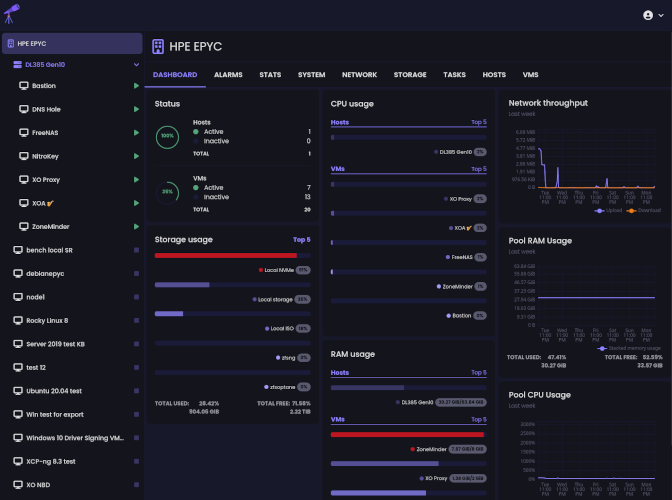
You can now see a network and a RAM usage graph for your pool dashboard:
🆕 Current Web UI improvements
We continue to also improve the current XO 5 web interface, providing "quality of life" features, so managing your infrastructure is easier than ever.
Toggle for Viridian extensions
This is a parameter that is normally enabled by default for all Windows templates after Windows 2012. Those extensions (called "Viridian enlightenments" by Microsoft) are used by any "recent" Windows OS to work properly.
However, during some external VM imports, they might be disabled. The VM Advanced tab now allows to enable them:

Enable NBD for a network
As a quick reminder, we managed to improve the backup speed by relying on NBD, you can read more in our previous release announcement:
 Olivier Lambert
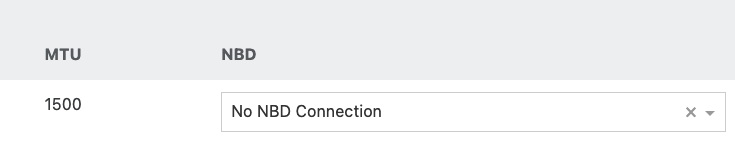
But until now, you had to enable NBD using the CLI. Since it's more important now, we decided to expose this feature in the Xen Orchestra web UI:

And for existing networks, you have now a new row allowing you to enable/disable NBD from the UI:
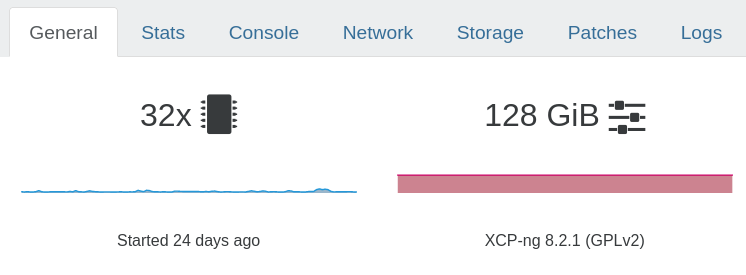
Rounding host memory
It sounds like nothing, but I have to admit it bothered me for years. Xen Orchestra fetched the API information on the total memory usable for a host, and it was usually something like this:
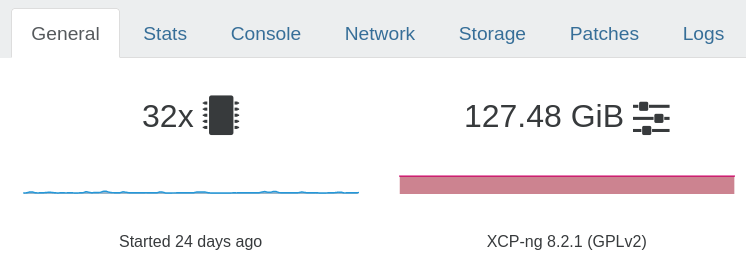
Why 127.48GiB? Well, remember you are using Xen. It's a microkernel booting on the metal. It is very small, and require to use a small fraction of your host memory to operate. The rest is used by your Dom0 and your regular VMs.
Since this information isn't really relevant for your everyday usage (especially since it's always a small fraction of your total memory, like few MiB on a small system), we decided to hide it by rounding it:
Renaming Citrix PV tool
A classic mistake that users could potentially make in Xen Orchestra: you are using XCP-ng tools in your Windows VM, and then you decide to enable Windows Update for PV tools. However, this is only working if you have Citrix tools installed, because mixing them will cause at best a loss of PV drivers, and at worst a crash of your VM.
To prevent this situation happening, we decided to rename the feature in the UI to more accurately reflect this:

Closing thoughts
As you can see, it's a pretty large release. We hope to maintain this fast pace of innovation and improvement for the whole year. Stay tuned for exciting news coming during this quarter!