
VirtOps #1: XO Terraform provider
DevOps series is back, and with great content about Terraform and Xen Orchestra!


Welcome to the next installment in the devops series! With its growing popularity, no devops series would be complete without discussing Terraform.
This post explains how to get setup with Terraform, launch VMs on your Xen Orchestra deployment and adapt that infrastructure over time.
A big welcome to Dom! A chemical engineer turned SRE (Site Reliability Engineering). Dom has spent the last 5 years working on cloud infrastructure and has an interest in bringing popular cloud tooling to the bare metal world. Vates is currently sponsoring Dom to work on the Terraform Xen Orchestra provider in his spare time.
Terraform background
Terraform is a cloud/platform agnostic tool for building, changing, and versioning infrastructure. Terraform can manage existing and popular service providers as well as custom in-house solutions (like Xen Orchestra). It can manage resources through their entire lifecycle or even manage infrastructure it didn't initially create.

Terraform safely and predictably creates infrastructure through its two step workflow. The terraform plan command will describe the resources terraform will create, update or delete with your current code. This gives you a clear understanding of the actions terraform will perform when you are ready to apply the configuration. Once you are satisfied with the plan, the terraform apply command will cause terraform to perform the actions in the plan. This workflow gives you confidence that terraform will perform the change you expect and also makes the process of provisioning infrastructure easy to code review.
Launching Virtual Machines in XO with Terraform
This section provides a walkthrough on how to use the terraform provider to create a VM and later add another network interface to it.
Below are the steps explained throughout this post:
- Install terraform
- Create a VM template for the new VM
- Provision the VM with terraform
- Add an additional network interface to the VM after creation
The code in this tutorial can be found on GitHub but we will write it from scratch step by step.
Installing terraform
If you don't have terraform installed, follow this Hashicorp tutorial to install it.
Note: we will be using features from the latest terraform version (0.13.0 at the time of this writing). Make sure you have installed atleast 0.13.0.
Creating a VM template
The terraform provider expects a VM template with an already installed OS. In a later post, we will describe how to create and manage these VM templates with another popular devops tool, Packer. For now we will create a VM template manually through the XO UI.
Note: if you already have a VM template with an installed OS you can skip this and proceed to the next step.
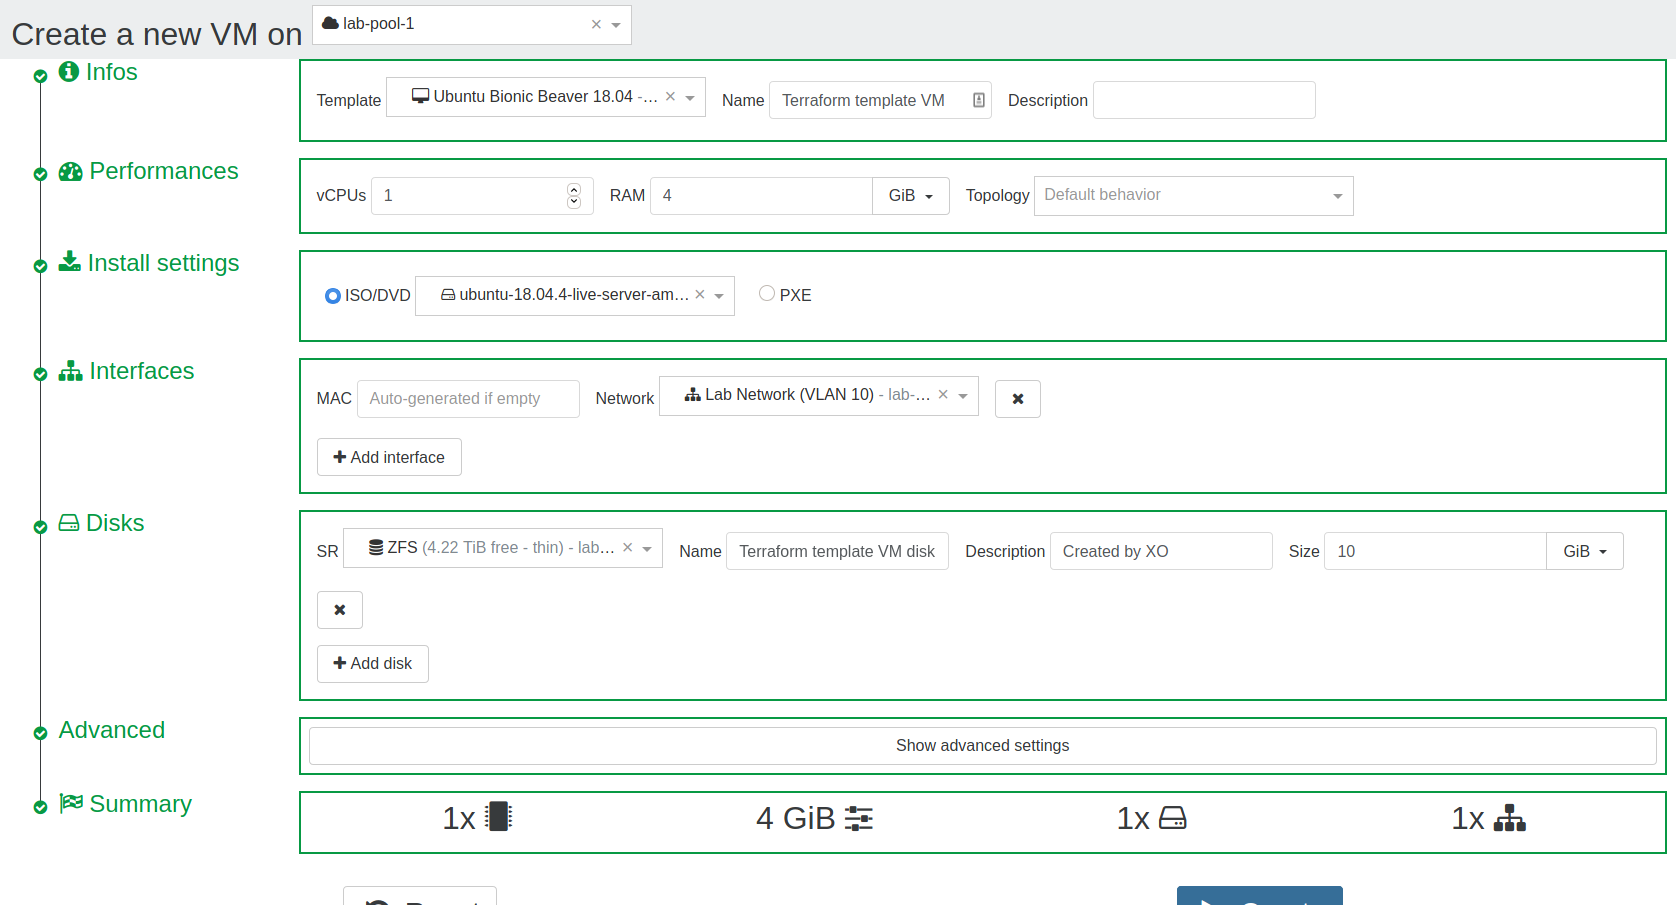
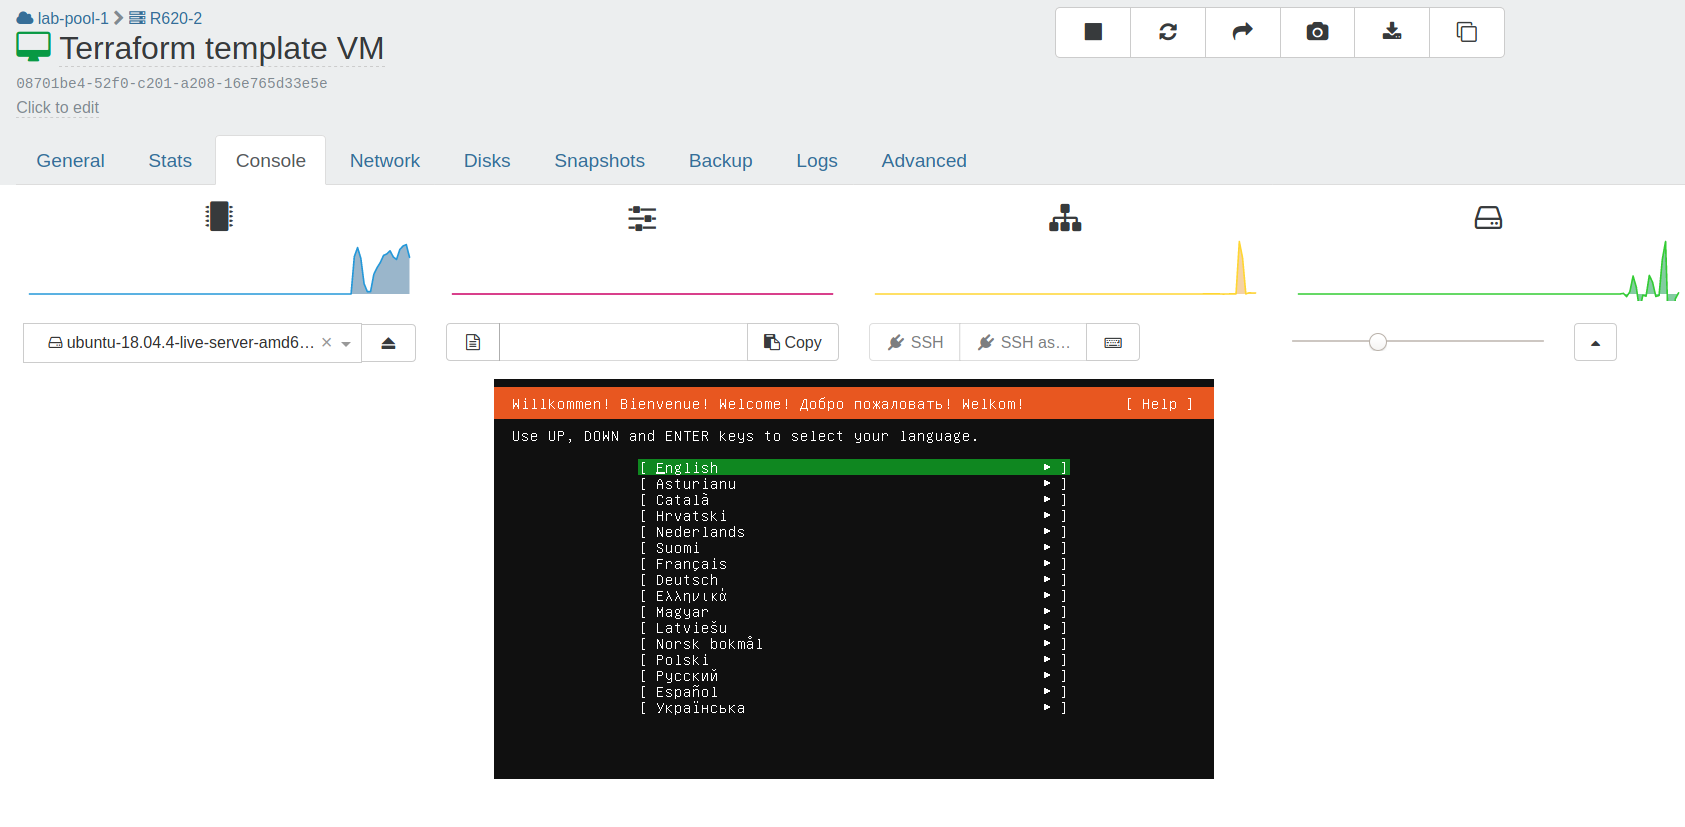
I will create a Ubuntu Bionic VM template but use an available ISO in your existing deployment. Once the VM starts, use the XO UI to finish the OS install through the VM console.
Once the installation is complete, stop the VM and convert it to a template.

Provisioning a VM with terraform
Now that a template is created, we can move on to writing the terraform code.
The first step is to configure terraform to install the xenorchestra terraform provider. The following code will instruct terraform to download the xenorchestra module from the terraform registry.
# provider.tf
terraform {
  required_providers {
    xenorchestra = {
      source = "vatesfr/xenorchestra"
      version = "~> 0.9"
    }
  }
}
Running terraform init should now download the XO provider.
$ terraform init

Initializing the backend...

Initializing provider plugins...
- Finding vatesfr/xenorchestra versions matching "~> 0.9"...
- Installing vatesfr/xenorchestra v0.9.1...
- Installed vatesfr/xenorchestra v0.9.1 (self-signed, key ID DDBA1674AA3EA0EE)

Partner and community providers are signed by their developers.
If you'd like to know more about provider signing, you can read about it here:
https://www.terraform.io/docs/plugins/signing.html

Terraform has been successfully initialized!

You may now begin working with Terraform. Try running "terraform plan" to see
any changes that are required for your infrastructure. All Terraform commands
should now work.

If you ever set or change modules or backend configuration for Terraform,
rerun this command to reinitialize your working directory. If you forget, other
commands will detect it and remind you to do so if necessary.
The terraform provider needs credentials to authenticate with the XO api. These can be provided directly in the terraform code, however, the safest way to provide these credentials is through environment variables (to avoid storing sensitive data in version control).
Create a ~/.xoa file (shown below) and then source the credentials into the current shell with eval $(cat ~/.xoa).
# ~/.xoa
export XOA_URL=ws://hostname-of-your-deployment
export XOA_USER=YOUR_USERNAME
export XOA_PASSWORD=YOUR_PASSWORD
With the provider installed and credentials configured, it's time to write the terraform code for the VM. The three main components for creating a VM are storage, a network and a VM template. We will use data sources to have terraform look up the necessary storage, networking and template inputs required to create a VM resource. Data sources are read only and are often used to retrieve dynamic values or IDs that would provide little context in code (UUIDs, autogenerated numbers, etc).
The following code will retrieve the storage, networking and VM template.
Note: Update the name_label of the data sources with the names of your pool, network, storage repository and VM template respectively
# vm.tf
data "xenorchestra_pool" "pool" {
  name_label = "lab-pool-1"
}

data "xenorchestra_template" "vm_template" {
  name_label = "Terraform template VM"
}

data "xenorchestra_sr" "sr" {
  name_label = "ZFS"
  pool_id = data.xenorchestra_pool.pool.id
}

data "xenorchestra_network" "network" {
  name_label = "Pool-wide network associated with eth0"
  pool_id = data.xenorchestra_pool.pool.id
}
At this point, we can run terraform plan to ensure that all the data sources are properly found.
$ terraform plan
Refreshing Terraform state in-memory prior to plan...
The refreshed state will be used to calculate this plan, but will not be
persisted to local or remote state storage.

data.xenorchestra_pool.pool: Refreshing state... [id=355ee47d-ff4c-4924-3db2-fd86ae629676]
data.xenorchestra_template.vm_template: Refreshing state... [id=08701be4-52f0-c201-a208-16e765d33e5e]
data.xenorchestra_network.network: Refreshing state... [id=a12df741-f34f-7d05-f120-462f0ab39a48]

------------------------------------------------------------------------

No changes. Infrastructure is up-to-date.

This means that Terraform did not detect any differences between your
configuration and real physical resources that exist. As a result, no
actions need to be performed.
Since we've only used data sources up to this point, terraform is merely looking up existing resources and a No changes plan is expected.
Now that the inputs for the VM are identified, it's time to write the terraform for the VM resource.
resource "xenorchestra_vm" "vm" {
  memory_max = 2147467264
  cpus = 1
  name_label = "XO terraform tutorial"
  template = data.xenorchestra_template.vm_template.id

  network {
    network_id = data.xenorchestra_network.network.id
  }

  disk {
    sr_id = data.xenorchestra_sr.sr.id
    name_label = "VM root volume"
    size = 50212254720
  }
}
Running terraform plan we will see that terraform will attempt to create a vm resource.
Terraform will perform the following actions:

  # xenorchestra_vm.vm will be created
  + resource "xenorchestra_vm" "vm" {
      + auto_poweron = false
      + core_os      = false
      + cpu_cap      = 0
      + cpu_weight   = 0
      + cpus         = 1
      + id           = (known after apply)
      + memory_max   = 2147467264
      + name_label   = "XO terraform tutorial"
      + template     = "08701be4-52f0-c201-a208-16e765d33e5e"

      + disk {
          + attached   = true
          + name_label = "VM root volume"
          + position   = (known after apply)
          + size       = 50214207488
          + sr_id      = "86a9757d-9c05-9fe0-e79a-8243cb1f37f3"
          + vbd_id     = (known after apply)
          + vdi_id     = (known after apply)
        }

      + network {
          + attached    = true
          + device      = (known after apply)
          + mac_address = (known after apply)
          + network_id  = "a12df741-f34f-7d05-f120-462f0ab39a48"
        }
    }

Plan: 1 to add, 0 to change, 0 to destroy.
We can now apply the change and have terraform create the VM.
$ terraform apply
data.xenorchestra_template.vm_template: Refreshing state...
data.xenorchestra_pool.pool: Refreshing state...
data.xenorchestra_network.network: Refreshing state...
data.xenorchestra_sr.sr: Refreshing state...

An execution plan has been generated and is shown below.
Resource actions are indicated with the following symbols:
  + create

Terraform will perform the following actions:

  # xenorchestra_vm.vm will be created
  + resource "xenorchestra_vm" "vm" {
      + auto_poweron = false
      + core_os      = false
      + cpu_cap      = 0
      + cpu_weight   = 0
      + cpus         = 1
      + id           = (known after apply)
      + memory_max   = 2147467264
      + name_label   = "XO terraform tutorial"
      + template     = "08701be4-52f0-c201-a208-16e765d33e5e"

      + disk {
          + attached   = true
          + name_label = "VM root volume"
          + position   = (known after apply)
          + size       = 50214207488
          + sr_id      = "86a9757d-9c05-9fe0-e79a-8243cb1f37f3"
          + vbd_id     = (known after apply)
          + vdi_id     = (known after apply)
        }

      + network {
          + attached    = true
          + device      = (known after apply)
          + mac_address = (known after apply)
          + network_id  = "a12df741-f34f-7d05-f120-462f0ab39a48"
        }
    }

Plan: 1 to add, 0 to change, 0 to destroy.


Do you want to perform these actions?
  Terraform will perform the actions described above.
  Only 'yes' will be accepted to approve.

  Enter a value: yes

xenorchestra_vm.vm: Creating...
xenorchestra_vm.vm: Still creating... [10s elapsed]
xenorchestra_vm.vm: Creation complete after 18s [id=4028c860-9c86-cec7-df02-4bddf1d32ead]

Apply complete! Resources: 1 added, 0 changed, 0 destroyed.
With that you should have a newly launched VM! Any future changes to this VM can now be easily code reviewed and version controlled. In order to demonstrate this, let's imagine that this VM needs a second network interface.
Update the terraform code to add a second network block like the following
# vm.tf
resource "xenorchestra_vm" "vm" {
  memory_max = 2147467264
  cpus = 1
  name_label = "XO terraform tutorial"
  template = data.xenorchestra_template.vm_template.id

  network {
    network_id = data.xenorchestra_network.network.id
  }

  network {
    network_id = data.xenorchestra_network.network.id
  }

  disk {
    sr_id = data.xenorchestra_sr.sr.id
    name_label = "VM root volume"
    size = 50212254720
  }
}
Running terraform plan shows that terraform is going to add a network interface to the VM.
$ terraform plan

...
...
Terraform will perform the following actions:

  # xenorchestra_vm.vm will be updated in-place
  ~ resource "xenorchestra_vm" "vm" {
        auto_poweron = false
        core_os      = false
        cpu_cap      = 0
        cpu_weight   = 0
        cpus         = 1
        id           = "4028c860-9c86-cec7-df02-4bddf1d32ead"
        memory_max   = 2147467264
        name_label   = "XO terraform tutorial"
        template     = "08701be4-52f0-c201-a208-16e765d33e5e"

        disk {
            attached   = true
            name_label = "VM root volume"
            position   = "0"
            size       = 50214207488
            sr_id      = "86a9757d-9c05-9fe0-e79a-8243cb1f37f3"
            vbd_id     = "633ccda8-51fb-0cf9-b257-d8ca565ee124"
            vdi_id     = "3d24f84a-298d-41aa-90a6-690508e1770d"
        }

        network {
            attached    = true
            device      = "0"
            mac_address = "8e:8b:c5:f3:df:4a"
            network_id  = "a12df741-f34f-7d05-f120-462f0ab39a48"
        }
      + network {
          + attached   = true
          + network_id = "a12df741-f34f-7d05-f120-462f0ab39a48"
        }
    }

Plan: 0 to add, 1 to change, 0 to destroy.
You would continue to update the code and re-run terraform plan until you are satisfied with the actions terraform will take. You would then open up a pull request (code review) on your repository and attach the terraform plan for review.
Once the change is approved, merge your branch into master and continue to apply the change.
$ terraform apply
data.xenorchestra_template.vm_template: Refreshing state... [id=08701be4-52f0-c201-a208-16e765d33e5e]
data.xenorchestra_pool.pool: Refreshing state... [id=355ee47d-ff4c-4924-3db2-fd86ae629676]
xenorchestra_vm.imported: Refreshing state... [id=5019156b-f40d-bc57-835b-4a259b177be1]
data.xenorchestra_network.network: Refreshing state... [id=a12df741-f34f-7d05-f120-462f0ab39a48]
data.xenorchestra_sr.sr: Refreshing state... [id=86a9757d-9c05-9fe0-e79a-8243cb1f37f3]
xenorchestra_vm.vm: Refreshing state... [id=4028c860-9c86-cec7-df02-4bddf1d32ead]

An execution plan has been generated and is shown below.
Resource actions are indicated with the following symbols:
  ~ update in-place

Terraform will perform the following actions:

  # xenorchestra_vm.vm will be updated in-place
  ~ resource "xenorchestra_vm" "vm" {
        auto_poweron = false
        core_os      = false
        cpu_cap      = 0
        cpu_weight   = 0
        cpus         = 1
        id           = "4028c860-9c86-cec7-df02-4bddf1d32ead"
        memory_max   = 2147467264
        name_label   = "XO terraform tutorial"
        template     = "08701be4-52f0-c201-a208-16e765d33e5e"

        disk {
            attached   = true
            name_label = "VM root volume"
            position   = "0"
            size       = 50214207488
            sr_id      = "86a9757d-9c05-9fe0-e79a-8243cb1f37f3"
            vbd_id     = "633ccda8-51fb-0cf9-b257-d8ca565ee124"
            vdi_id     = "3d24f84a-298d-41aa-90a6-690508e1770d"
        }

        network {
            attached    = true
            device      = "0"
            mac_address = "8e:8b:c5:f3:df:4a"
            network_id  = "a12df741-f34f-7d05-f120-462f0ab39a48"
        }
      + network {
          + attached   = true
          + network_id = "a12df741-f34f-7d05-f120-462f0ab39a48"
        }
    }

Plan: 0 to add, 1 to change, 0 to destroy.

Do you want to perform these actions?
  Terraform will perform the actions described above.
  Only 'yes' will be accepted to approve.

  Enter a value: yes

xenorchestra_vm.vm: Modifying... [id=4028c860-9c86-cec7-df02-4bddf1d32ead]
xenorchestra_vm.vm: Still modifying... [id=4028c860-9c86-cec7-df02-4bddf1d32ead, 10s elapsed]
xenorchestra_vm.vm: Still modifying... [id=4028c860-9c86-cec7-df02-4bddf1d32ead, 20s elapsed]
xenorchestra_vm.vm: Still modifying... [id=4028c860-9c86-cec7-df02-4bddf1d32ead, 30s elapsed]
xenorchestra_vm.vm: Still modifying... [id=4028c860-9c86-cec7-df02-4bddf1d32ead, 40s elapsed]
xenorchestra_vm.vm: Modifications complete after 49s [id=4028c860-9c86-cec7-df02-4bddf1d32ead]

Apply complete! Resources: 0 added, 1 changed, 0 destroyed.
This makes infrastructure changes easily code reviewed and allows changes to your infrastructure to be tracked.
Stay tuned for later posts in this series that will show how terraform can manage existing infrastructure and how VM templates can be created and managed with Packer (another popular Hashicorp tool).
If you have any questions about the provider or other terraform use cases please reach out through Discord or create a GitHub issue.