
How to start with Vates Virtualization Management Stack
Kickstart your Vates VMS journey with these top tips: how to install XCP-ng, deploy XOA, create your VMs, configure your backup jobs and leverage our pro support.


Welcome to Vates Virtualization Management Stack!
We're happy to welcome you to the Vates platform!
Whether you're just getting started or looking to get started, this guide will provide you the tools you need to succeed with the Vates Virtualization Management Stack.
1. How to install XCP-ng
Let's get things started by installing XCP-ng, the hypervisor layer of your virtualization stack.
You can simply download the ISO of the latest version of XCP-ng on the official website.
You will see 2 available options for installing XCP-ng:
- You can download the ISO (current version is XCP-ng 8.2) and create a bootable USB key. Rufus is available for Windows users to create a bootable USB key
- You can perform a NET-install with the smaller dedicated ISO.
Installing XCP-ng on your physical server is as easy as plugin your USB key and following the installation wizzard.
Here is a Youtube tutorial to help you with the installation process:
2. How to deploy Xen Orchestra
Also, you should have an account created on the Vates portal, that will make the registration process of your appliance easier.
The next step is to deploy your Xen Orchestra Appliance. Xen Orchestra is the management, administration and backup interface for your virtual infrastructure. Xen Orchestra includes a complete set of features ranging from VM creation, live migration, resources delegation, full or incremental backup or replication.
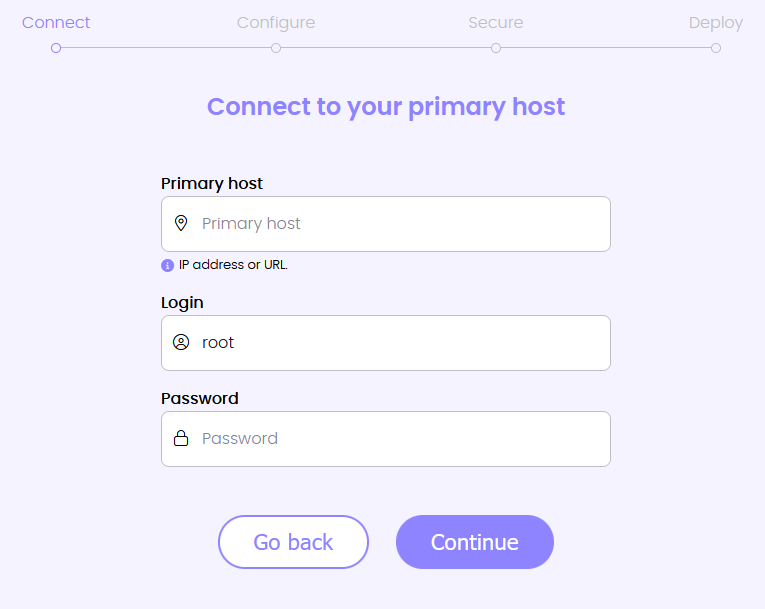
We have a dedicated tool for XOA deployment.
From there, you just have to follow the instruction.
For additional help we have a tutorial video for this step:
If the deploy tool does not work for you. We have other deployment methods available in our official documentation.
Xen Orchestra is committed to excellence with monthly updates, easily accessible via the 'Update' button on the XOA > update panel. For insights into each update, visit the Xen Orchestra Blog. Choose between the 'Stable Branch' for a thoroughly tested, slightly delayed version ensuring maximum stability, or the 'Latest Branch' to access the most current features. Both are designed to enhance your Xen Orchestra experience while catering to different operational needs.
3. How to begin your trial period
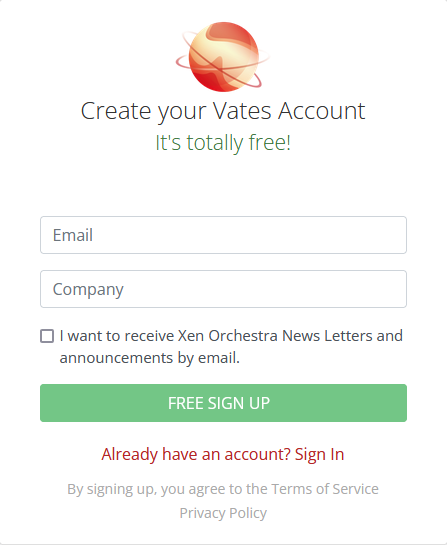
To start your trial, create your Vates Account. It's free, requires no credit card and there is no commitment.
Once you have created your account, you need to register your Xen Orchestra Appliance with this same email. Take a look on the official documentation if you need more guidance for this step.
From there, click the "Start Trial" button and then click on the "update" button of your appliance and that's it.
Once your trial with Vates has begun you will have 2 weeks to work on the Vates Virtualization Management Stack with our Trial Enterprise Bundle (that embeds the legacy XOA Premium edition). Our Bundles provide you the optimal way to experience Vates VMS with all features, tools and the expertise of our Pro Support Team. To ensure the best experience, the Trial Enterprise Bundle also includes all of these benefits with the exception of the guaranteed response time or the 24/7 support coverage
4. A quick tour of your VM Interface
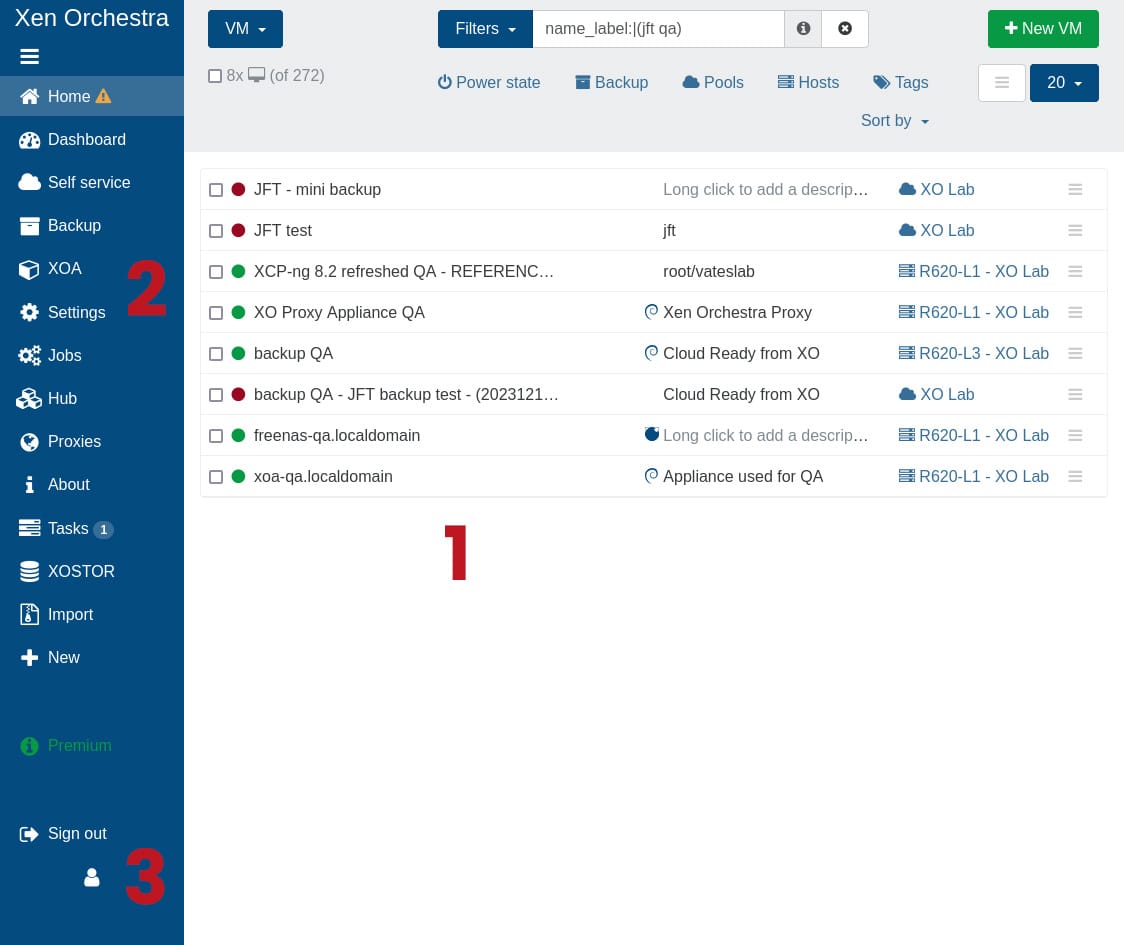
Above is your view on the Xen Orchestra homepage.
- In the main dashboard, you can see all your VMs, description, running status and the pool on which they are deployed.
- The menu in blue along the leftside of the page gives you access to all the important features (VM creation, backup, self-service...)
- By clicking the user icon, you can access to the UI settings tab in which you can personalize your experience in XOA (eg. set default filter)
Tags, in XOA are a versatile feature that allows you to categorize, organize, and manage your VMs more efficiently. They are particularly useful in complex or large-scale environments.
By assigning tags to your VMs, you can:
- Categorize them based on criteria such as purpose or environment,
- It makes it easier to filter and perform batch actions on a specific group of VMs
- Used in conjunction with the Smart Backup feature, you can set up backup jobs to automatically include or exclude VMs based on their assigned tags
5. How to create your first VM
From the homepage of Xen Orchestra, on the blue menu along the left side, click "+ New".
Prerequisites: Add your XCP-ng server to Xen Orchestra
- You need to have an XCP-ng (or XenServer) server available in your Xen Orchestra. You can add your first server by reaching the homepage and clicking on "Add server" button available there.
- You need to have an available ISO SR with the ISO OS you want to install.
Step 1: Prepare to Create a New VM
- Once the server is added, go to the "+ New VM" section.
- First, choose the pool in which you want to host your VM.
- Pick the template you want to use.
- Then, you'll be presented with a form to specify the details of the new VM.
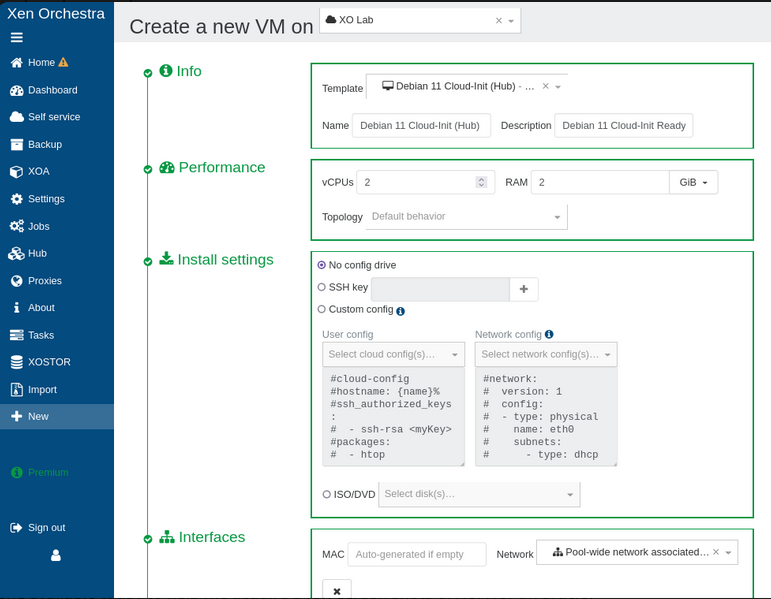
Step 2: Configure Your VM
- Template: Choose a template for the OS you plan to install.
- Name and Description: Give your VM a meaningful name and description.
- CPUs and Memory: Allocate the number of CPUs and the amount of memory.
- ISO/DVD: Attach your ISO SR with the OS you want
- Storage: Choose the storage repository and size for the virtual disk.
- Network: Select the network you wish the VM to connect to.
Step 3: Install settings & OS
- Once the VM is created, start the VM from the home view.
- Go to the console tab to proceed with the installation of the operating system as you would on a physical machine.
Step 4: Finalize and Optimize
- Once the OS is installed, install the appropriate guest tools for better performance and management.
Your VM is now created, you can now adjust your settings like auto power-on, dynamic RAM adjustment, Protect from deletion or shutdown directly in the advanced tab of your newly created VM.
6. Save/Export your XOA settings
After finalizing your basic configuration in Xen Orchestra Appliance (XOA), it's essential to export your settings for safekeeping. Navigate to Settings > Config to access the export and import option.
Regularly saving and exporting your XOA configuration is a prudent practice. It not only facilitates rapid redeployment in case of host failure but also simplifies the process of locating your backup/restore paths, ensuring a smoother recovery and management experience. This way, even if you lose your original XOA, you can confidently redeploy a new appliance and restore very easily your VMs.
To simplify this process and ensure your settings are up-to-date, Vates users with a support bundle can create an automated export of your XOA settings.
Step 1: Access Backup View
- Navigate to the "Backup" section in the main menu.
Step 2: Initiate New Backup Job
- Click on the "+ New" button located at the top right corner of the Backup section.
Step 3: Type of Backup
- Select XO config & Pool metadata Backup from the top right
- After selecting XO config & Pool metadata backup you can choose to backup one or both.
Step 4: Create a schedule
- Create a schedule of how frequently you would like the backup to run
- That's all, and you now have a regularly running backup of your XO config & Pool metadata
7. How to create a backup
Step 1: Access Backup View
- Navigate to the "Backup" section in the main menu.
Step 2: Initiate New Backup Job
- Click on the "+ New" button located at the top right corner of the Backup section.
Step 3: Configure Basic Settings
- Select Backup Type: Choose the type of backup you want to create. Your options are:
- Rolling Snapshot: Suitable for frequent, point-in-time snapshots.
- Full Backup: A regular backup, good for daily or weekly backups.
- Incremental Backup: Efficient for saving space as it only backs up the differences since the last backup.
- Full/Incremental Replication: Similar to the Full and Incremental backup feature except that you will target another XCP-ng host to minimize downtime in case of disaster.
- Name Your Backup Job: Assign a descriptive name to your backup job for easy identification.
Step 4: Configure Specific Settings
- Based on the type of backup you've selected, the interface will present specific options. Here are some common settings you might want to configure:
- VMs to Backup: Choose which VMs or group of VMs you want to include in the backup job.
- Schedule: Decide how often the backup should occur (e.g., daily, weekly, custom).
- Storage: Select where you want the backups to be stored.
- Retention: Specify how many backups you want to keep.
Step 5: Create a Backup Schedule
- Decide how often the backup should occur (e.g., daily, weekly, custom).
- if needed you can define more than one schedule for the same backup job
- Decide if you want to run a health check of your backup.
Step 6: Review and Save
- Once you've configured all the necessary settings, review your configuration to ensure everything is correct.
- Click "Create" or "Save" to establish your new backup job.
- A automated backup
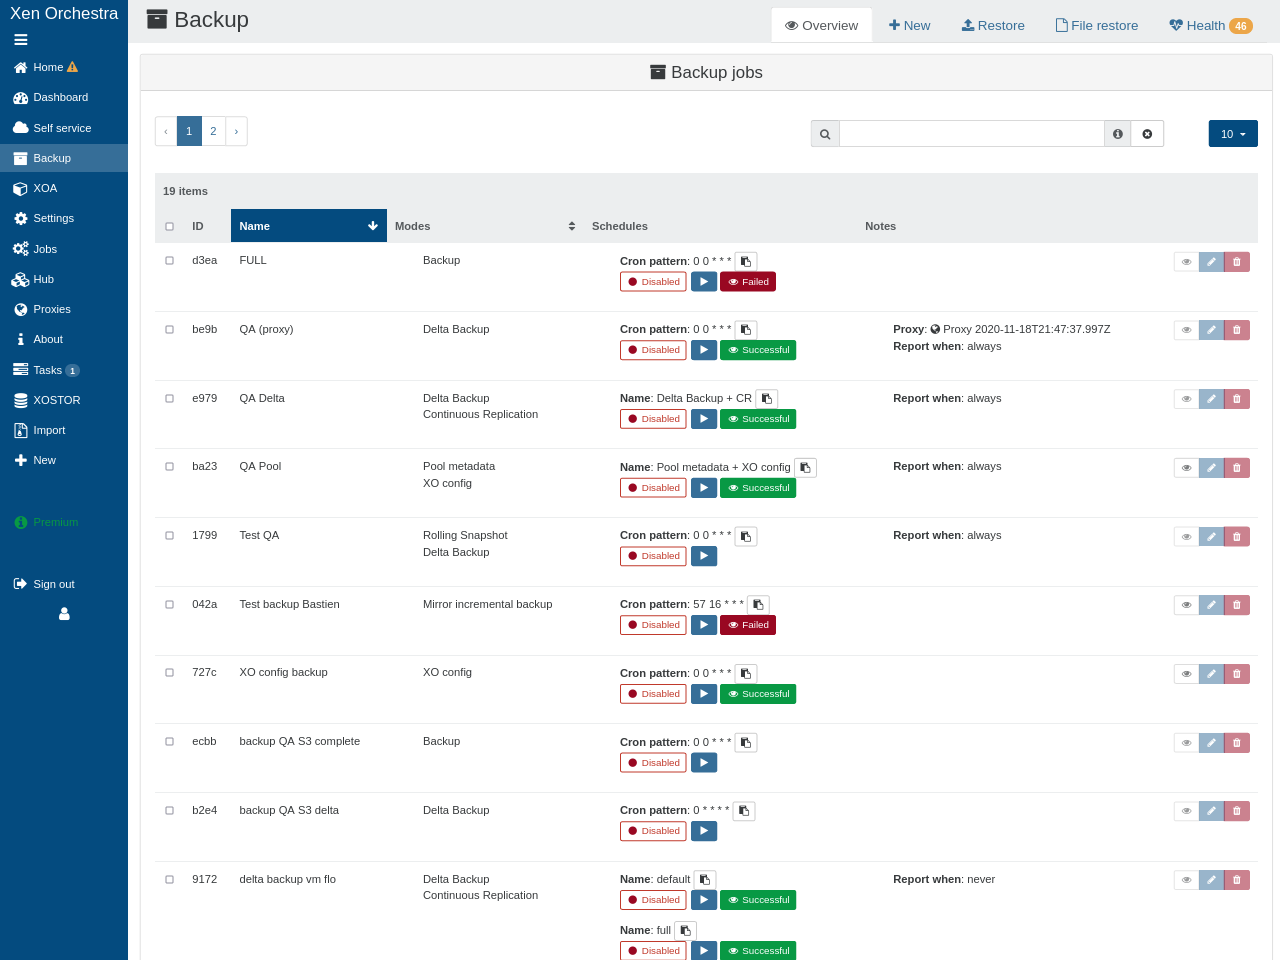
Step 7: Monitor and Manage
- After creating the job, you can monitor its progress and manage it through the "Backup" section. You'll be able to see upcoming tasks, history, and the status the latest backup operation performed.
You should test the integrity of your backup files on a regular basis. Xen Orchestra allows you to perform automatic or manual recovery tests.
8. How to restore a VM
Also located on the Backup page, the restore tab is visible among the top panels of this page.
Restoring your VM with Xen Orchestra is a straightforward process:
- Select your remote and click on the eye icon to see the VMs available
- Choose the backup you want to restore
- Select the SR where you want to restore it
Xen Orchestra provides the capability for file level restoration, offering a precise and convenient recovery option. However, it's important to note that this feature is exclusively available with the Incremental Backup type.
9. Use your Health dashboard
Within the Dashboard > Health view, you gain a comprehensive insight into your infrastructure and VMs' status. This dashboard is crucial for predictive maintenance and should be reviewed regularly.
If you encounter any listings under 'Unhealthy VDIs,' 'Orphan VDI,' 'Orphan Snapshots,' or other tables, it's advisable to seek support. Pro users (or those in a trial period) should consider opening a support ticket (you can do so directly from the XOA > Support section of your appliance). If you are using the source version as a homelabber, you may find valuable assistance by initiating a discussion on the community forum.
Maintaining ample free space in your Storage Repository is critical to ensuring smooth operation and data integrity:
- For NFS (or any thin-provisioned SR), strive to maintain a minimum of 10% free space as a buffer.
- For iSCSI (or any thick-provisioned SR), keep at least 20% of the storage space free.
10. How to get support for Vates VMS
Vates is dedicated to enhancing your virtualization journey with versatile support options.
For businesses utilizing our Virtualization Management Stack in production environments, we provide professional support for both XCP-ng and Xen Orchestra through our bundled offers. Discover our 2024 Bundles, combining XCP-ng Pro Support with Xen Orchestra Appliance in a single subscription in this blogpost:

We are committed to superior pro-support, redefining industry standards. Dive into our philosophy and unique approach to open-source professional support in our blogpost:

For individuals, home enthusiasts, and students, our vibrant community forums are the ideal place for support. Engage with categories dedicated to XCP-ng and Xen Orchestra, where insights, user experiences, and community assistance thrive.