From Backup Legacy to Backup NG
Xen Orchestra backup features for XenServer and XCP-ng has been revamp to offer a greater experience to all user. Learn how to migrate your job from the legacy backup to the new generation backup.

As you might have noticed in the last couple of months, we've been working on a new generation of backup features in Xen Orchestra.
Backup NG is better, faster, stronger and more reliable than our legacy backup system. Everything has been rebuilt from scratch to offer a better experience to all users, from small infrastructure to big datacenters running on XenServer or XCP-ng.
As the old Backup system is now deprecated, you cannot create jobs in the Backup view in XO anymore, all new jobs need to be created through the Backup NG panel. The jobs previously created will still run as scheduled and you can still edit them - however, it's highly recommended to migrate your legacy jobs to the new Backup NG panel. This blog post will help guide you through the process.
Backup NG is only one click away
The first step is actually very simple to achieve.
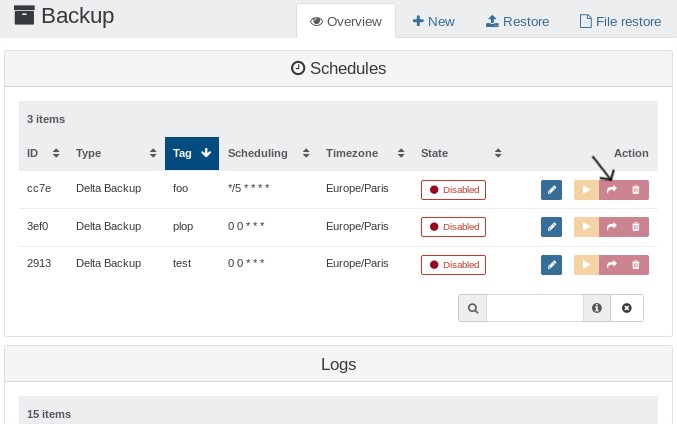
- Select the job you want to migrate in the backup legacy view
- Click on the "migrate to backup NG" button
That's it, your job has been moved to the Backup NG panel and should be running as scheduled previously.

Removing the old snapshot(s)
Note : If the job you migrated was a full backup job, you can skip this step.
The Xen Orchestra backup system creates a snapshot per VM during the backup process. When you are migrating your job, backup NG will create a new snapshot and use it as a base snapshot. Consequently, the old snapshots related to your old backup jobs are no longer required and need to be deleted, to avoid consuming space on your SR.
There are two ways to get rid of the old snapshots - you can do it manually, VM after VM or you can use the health view available in the backup NG panel.
Health View in Backup NG
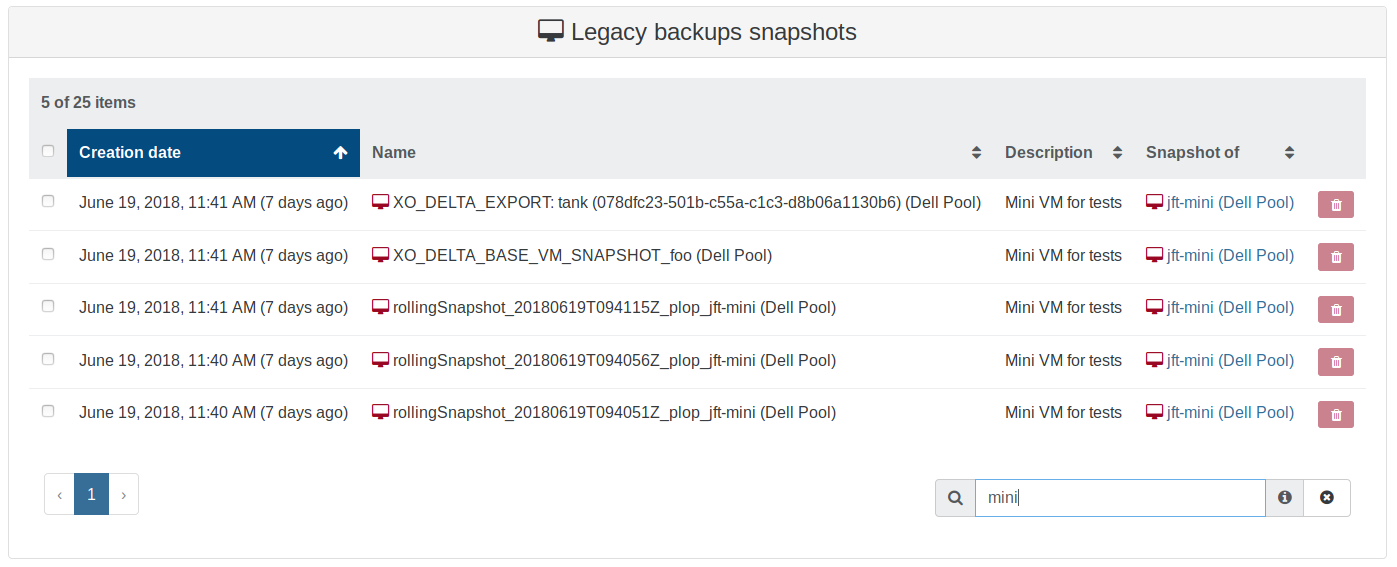
All the snapshots related to old backup jobs are listed in the health view in backup NG. Once you have done the migration of your legacy jobs, you can select all of them and delete them.

Manually
You can also manually delete the snapshots by looking for it on each VM.
-
For Continuous Replication jobs you need to search and delete snapshots starting with
XO_DELTA_EXPORT -
For Delta Backup jobs you need to search and delete snapshots starting with
XO_DELTA_BASE_VM_SNAPSHOT -
For Rolling snapshot, you need to search and delete snapshots starting with
Rollingsnapshot_

Delete the old backup files
Note: Proceed with this step once you are sure that you won't need to restore a VM using an old backup file, eg: you have a new backup file via a Backup-NG job.
When you are sure that everything is working fine for your new backup jobs, the last step is to clean your remote storage on which you were sending the backup.
With the old backup system - you could not remove a file on the remote from the Xen Orchestra interface, however it's now possible with Backup NG jobs.
For this step, you will need to manually connect to your remote and delete the file(s) related to your old backup jobs.
⚠ Do not touch the directory named
xo-vm-backups- it contains everything related to the Backup NG jobs. If you want to delete one of the files here, use the XO interface to do so.
Discover Xen Orchestra
You didn't know that Xen Orchestra provides a complete features panel for XenServer VM backups (or XCP-ng)? Sign-up and try Xen Orchestra for free!


